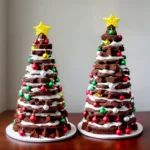
Candy Melt Trees: A Sweet and Creative Delight
Are you looking for a fun and delicious way to add some festive flair to your holiday celebrations? Look no further than candy melt trees! These delightful creations are not only visually appealing but also incredibly tasty. Whether you’re a seasoned baker or a novice in the kitchen, making candy melt trees is a breeze. So, grab your apron and let’s dive into the world of sweet and creative delights!
What are Candy Melt Trees?
Candy melt trees are edible decorations made using candy melts, which are small discs of colored candy coating. These discs are melted and then molded into tree shapes using a special tree-shaped mold. The result is a beautiful and eye-catching treat that is perfect for any occasion.
Why Choose Candy Melt Trees?
There are numerous reasons why candy melt trees are a fantastic choice for your next baking adventure. Firstly, they are incredibly versatile. You can customize your candy melt trees by using different colors and flavors of candy melts, as well as adding various toppings such as sprinkles or edible glitter.
Secondly, candy melt trees are a great option for those who may not have advanced baking skills. Unlike intricate cake decorating techniques or complex cookie designs, candy melt trees are simple to make and require minimal equipment. All you need is a tree-shaped mold, candy melts, and a little bit of creativity!
How to Make Candy Melt Trees?
Making candy melt trees is as easy as 1-2-3! Here’s a step-by-step guide to help you create these delightful treats:
Step 1: Melt the Candy Melts
Start by melting your desired colors of candy melts. You can do this either in a microwave-safe bowl or using a double boiler. Follow the instructions on the candy melt packaging for the best results. Once melted, transfer the candy melts into a piping bag or a ziplock bag with a small hole cut at one corner.
Step 2: Fill the Mold
Take your tree-shaped mold and fill each cavity with the melted candy melts. Use the piping bag or ziplock bag to carefully fill the mold, starting from the bottom and working your way up. Gently tap the mold on the countertop to remove any air bubbles.
Step 3: Decorate and Set
Before the candy melts set, you can add decorations such as sprinkles or edible glitter to give your candy melt trees some extra pizzazz. Once you’re done decorating, place the mold in the refrigerator for about 10-15 minutes or until the candy melts are completely hardened.
How to Serve Candy Melt Trees?
Candy melt trees can be served in a variety of ways. You can simply place them on a platter as a festive centerpiece or use them as cake toppers. If you’re feeling adventurous, you can even attach them to cupcakes or cookies for an added touch of sweetness. The possibilities are endless!
Conclusion
Candy melt trees are a delightful and creative way to add some sweetness to your holiday celebrations. With their customizable nature and ease of preparation, they are the perfect treat for both experienced bakers and beginners alike. So, why not give candy melt trees a try and bring some edible holiday magic to your table?
Frequently Asked Questions (FAQs)
Q1: Can I use different flavors of candy melts?
A1: Absolutely! You can experiment with different flavors of candy melts to create a unique taste experience.
Q2: Where can I find a tree-shaped mold?
A2: Tree-shaped molds can be found in baking supply stores or online retailers specializing in baking equipment.
Q3: Can I make candy melt trees in advance?
A3: Yes, you can make candy melt trees in advance. Simply store them in an airtight container at room temperature until you’re ready to serve.
Q4: Are candy melt trees suitable for children?
A4: Candy melt trees are a fun treat for children, but adult supervision may be required when working with hot candy melts.
Q5: Can I use candy melt trees as edible gifts?
A5: Absolutely! Candy melt trees make for lovely edible gifts. Package them in clear cellophane bags or small boxes tied with ribbon for a festive touch.
Q6: Can I use candy melt trees to decorate a gingerbread house?
A6: Yes, candy melt trees can be a wonderful addition to a gingerbread house. They add a pop of color and a touch of sweetness to your festive creation.
Q7: Can I use candy melt trees to decorate a holiday-themed cake?
A7: Absolutely! Candy melt trees can be placed on top of a cake for a whimsical and festive touch. They can also be arranged around the base of the cake for a stunning display.
Q8: How long do candy melt trees last?
A8: Candy melt trees can last for several weeks when stored properly in an airtight container at room temperature.

Candy Melt Trees
Instructions
- Arrange pretzel sticks on a baking sheet lined with parchment paper.
- Microwave 1 cup of green candy melts in 30-second intervals until fully melted.
- Transfer the melted candy melts into a piping bag.
- Pipe a zigzag tree shape on top of each pretzel stick, making sure to leave the bottom half of the pretzel uncovered.
- Sprinkle rainbow nonpareils over the piped candy melts.
- Allow the trees to set for approximately 10 minutes.
- It is recommended to prepare a few extra trees as a backup in case of any breakage.


