Christmas Brownie Trees
Rate this recipeBe the first to rate
 By AprilPublished
 Christmas is a time for festive treats and indulgence. And what better way to celebrate the holiday season than with Christmas Brownie Trees?
 By AprilPublished
 Christmas is a time for festive treats and indulgence. And what better way to celebrate the holiday season than with Christmas Brownie Trees?
Preheat the oven to 350 degrees F.
Butter the bottom and sides of two 8-inch round cake pans.
Cut two 8-inch circles out of parchment and line the bottoms of the cake pans with the parchment.
In a medium bowl, stir together the butter, granulated sugar, vanilla, and eggs.
In another bowl, whisk together the flour, cocoa powder, salt, and baking powder.
Add the dry ingredients to the wet ingredients and stir until just combined.
Stir in the chocolate chips.
Divide the batter between the prepared pans, smoothing the tops.
Bake in the preheated oven for 35 to 40 minutes or until the brownies begin to gain a crust around the edges, pull away from the edge, and a toothpick inserted in the center comes out clean.
Let the brownies cool fully in the pans on cooling racks for about 1 hour.
Cut each circle into 8 equal triangles with a knife.
Use a small offset spatula or pie server to lift each triangle out of the pan.
Combine the confectioners' sugar, butter, and salt in the bowl of a stand mixer fitted with a paddle attachment (or in a large bowl if using a handheld electric mixer).
Mix on low speed until mostly incorporated.
Add the vanilla and increase the speed to medium-high, mixing until smooth.
16.
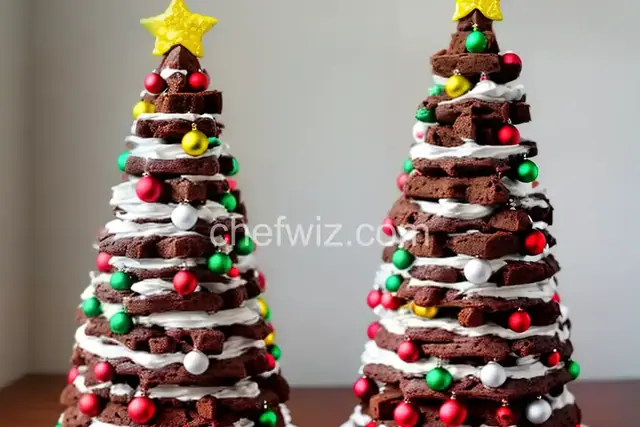
Christmas is a time for festive treats and indulgence. And what better way to celebrate the holiday season than with Christmas Brownie Trees? These delightful treats combine the rich and fudgy goodness of brownies with the whimsy and beauty of Christmas trees. They are not only delicious but also make for a visually stunning addition to any holiday spread. So, let's dive into the world of Christmas Brownie Trees and discover why they are the perfect treat for this joyous season!
Imagine biting into a moist and chocolatey brownie that's been transformed into a whimsical Christmas tree. The combination of flavors and textures is simply irresistible. Each bite is a burst of decadence, with the sweet and fudgy brownie complemented by the smooth and creamy icing. And let's not forget the festive decorations that adorn these trees – colorful sprinkles, edible pearls, and even a star on top! Every element comes together to create a treat that is both delicious and visually appealing.
Not only do Christmas Brownie Trees taste amazing, but they also bring a sense of joy and wonder to the holiday season. Just like a real Christmas tree, these brownie creations can be personalized and decorated to reflect your own unique style. You can go for a traditional look with green icing and red sprinkles, or get creative with different colors and designs. The possibilities are endless, and the process of decorating each tree can be a fun activity for the whole family.
Creating your own Christmas Brownie Trees is easier than you might think. With just a few simple ingredients and some creativity, you can bring these festive treats to life. Start by baking a batch of your favorite brownies and letting them cool completely. Then, using a Christmas tree-shaped cookie cutter, cut out individual tree shapes from the brownies.
Next comes the fun part – decorating! Prepare a batch of icing in your desired color(s) and use it to frost each brownie tree. You can use a piping bag or a ziplock bag with the corner snipped off to create decorative patterns and designs. Finally, add your favorite festive decorations – sprinkles, edible pearls, or even mini candy canes.
Once your Christmas Brownie Trees are fully decorated, allow the icing to set before serving. This will ensure that the decorations stay in place and the flavors meld together. The end result is a stunning and delicious treat that will wow your guests and leave them wanting more.
Christmas Brownie Trees are a delightful and festive treat that combines the joy of the holiday season with the decadence of chocolatey brownies. These visually stunning creations are not only delicious but also allow for personalization and creativity. Whether you're serving them at a holiday party or gifting them to loved ones, Christmas Brownie Trees are sure to bring smiles and delight to all who indulge in them. So, go ahead and spread some holiday cheer with these tasty and whimsical treats!
While brownies work best for creating the dense and fudgy texture of Christmas Brownie Trees, you can experiment with using other types of cake. Just keep in mind that the texture and taste may vary.
Absolutely! Making brownies from scratch allows you to customize the flavors and ingredients to your liking. Just make sure to let them cool completely before cutting out the tree shapes.
When stored in an airtight container at room temperature, Christmas Brownie Trees can stay fresh for up to 3-4 days. However, they are best enjoyed within the first couple of days.
Yes, you can freeze Christmas Brownie Trees for later enjoyment. Wrap them tightly in plastic wrap and store them in an airtight container or freezer bag. Thaw them at room temperature before serving.
Absolutely! Get creative and use your favorite colors to make your Christmas Brownie Trees truly unique and eye-catching.
While Christmas Brownie Trees are traditionally associated with the holiday season, there's no reason why you can't make them for other holidays as well. Simply adapt the decorations to match the occasion.
Yes, store-bought icing can be used to decorate your Christmas Brownie Trees. However, homemade icing allows for more customization and flavor options.
Absolutely! Christmas Brownie Trees make a thoughtful and delicious gift for friends and family. Package them in a festive box or wrap them individually for a delightful surprise.
AprilCook, recipe developer and the heart of Chefwiz. More about April