Guava Bars Recipe
Rate this recipeBe the first to rate
 By AprilPublished
 Have you ever tasted a burst of tropical flavors in a single bite?
 By AprilPublished
 Have you ever tasted a burst of tropical flavors in a single bite?
Grease a 9- by 13-inch baking pan using butter.
Move the oven rack to the middle position and preheat the oven to 350°F (180°C).
In the bowl of a stand mixer fitted with a paddle attachment or using a hand-held mixer, beat the butter and sugar until it becomes fluffy, approximately for 3 minutes. Then, add salt and flour to the mixture and beat until the dough comes together.
Press the dough evenly into the prepared pan.
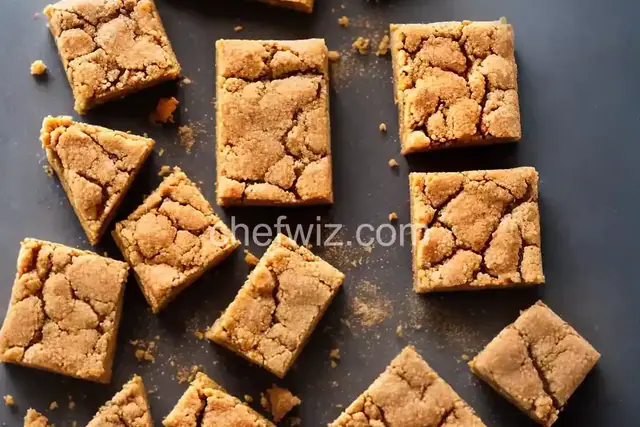
Cover the dough with slices of guava paste.
In the bowl of a food processor, combine oats, butter, salt, and sugar. Pulse the mixture 10 times. Then, add flour and pulse until the mixture resembles wet sand.
Sprinkle the mixture evenly over the top of the pan.
Bake until the top turns golden, which usually takes about 45 minutes.
Allow the baked dish to cool completely before cutting it into bars.
Have you ever tasted a burst of tropical flavors in a single bite? If not, then you're in for a treat! Guava bars are the perfect dessert to transport you to a sunny beach, where the sweet and tangy flavors of guava take center stage. In this article, we'll explore the tantalizing world of guava bars and how you can create your own tropical delight at home.
Guava is a fruit that is often overlooked, but it is bursting with health benefits. It is packed with vitamins A and C, fiber, and antioxidants. Not only does it taste delicious, but it also promotes good digestion, boosts your immune system, and supports healthy skin.
By incorporating guava into a dessert like bars, you can enjoy all these benefits while satisfying your sweet tooth. Guava bars are the perfect balance of sweet and tangy, making them a crowd-pleaser for any occasion.
Now that you're convinced of the wonders of guava bars, let's dive into the process of making them. The first step is to gather all the necessary ingredients. You'll need a buttery crust, a flavorful guava filling, and a crumbly topping.
The crust acts as a sturdy foundation for your bars. It should be buttery, flaky, and slightly sweet, providing the perfect contrast to the tangy guava filling. Think of it as the sandy beach that holds everything together.
Next comes the star of the show - the guava filling. It should be thick, luscious, and bursting with tropical flavor. The guava filling is like the bright sun that shines on your taste buds, awakening them with every bite.
To finish off your guava bars, add a crumbly topping. This adds a delightful crunch and texture to each bite, reminiscent of the waves crashing on the shore. It's the final touch that completes the tropical experience.
Creating the perfect guava bars requires some finesse. Here are a few tips and tricks to ensure your bars turn out just right:
The flavor of your guava bars depends on the quality of the fruit. Choose ripe guavas that are fragrant and slightly soft to the touch. This will ensure a vibrant and flavorful filling.
After baking your guava bars, allow them to cool completely before cutting into squares. This will help them set and maintain their shape.
While a crumbly topping is traditional, feel free to get creative with different variations. You can add chopped nuts, coconut flakes, or even a drizzle of chocolate for extra indulgence.
Guava bars are the perfect way to bring a taste of the tropics into your kitchen. With their sweet and tangy flavors, buttery crust, and crumbly topping, they are sure to delight your taste buds. Whether enjoyed on a sunny afternoon or shared with loved ones, guava bars are a tropical delight that will transport you to paradise. So go ahead, indulge in this fruity adventure and savor the flavors of guava in every bite!
Absolutely! Frozen guava works just as well for the filling. Just make sure to thaw and drain the guava before using it to avoid excess moisture.
Yes, you can! There are plenty of gluten-free crust options available, such as almond flour or gluten-free graham crackers. Experiment with different alternatives to find the perfect match for your dietary needs.
Guava bars can be stored in an airtight container in the refrigerator for up to five days. However, they are so delicious that they are unlikely to last that long!
Of course! While guava is the star of this recipe, you can experiment with other fruits like mango, pineapple, or passion fruit. The choice is yours!
Absolutely! Guava bars can be made in advance and stored in the refrigerator. Just make sure to bring them to room temperature before serving for the best flavor.
Yes, you can freeze guava bars for up to three months. Just wrap them tightly in plastic wrap or place them in an airtight container before freezing.
Definitely! A cream cheese layer adds a creamy and tangy element to your guava bars. Simply spread a thin layer of cream cheese on the crust before adding the guava filling.
Absolutely! The combination of warm guava bars and cold ice cream is a match made in dessert heaven. Top your bars with a scoop of vanilla or coconut ice cream for a truly indulgent treat.
AprilCook, recipe developer and the heart of Chefwiz. More about April