Aunt Louise’s Red Velvet Cake
Rate this recipeBe the first to rate
 By AprilPublished
 Have you ever tasted a cake so moist and velvety, it practically melts in your mouth?
 By AprilPublished
 Have you ever tasted a cake so moist and velvety, it practically melts in your mouth?
Preheat the oven to 350°F.
Grease and flour three 9-inch round cake pans and line the bottoms with waxed or parchment paper.
In a bowl, combine the flour, cocoa, baking soda, and salt. Set aside.
In a measuring cup, mix together the buttermilk, vanilla extract, and vinegar. Set aside.
In the bowl of a heavy-duty mixer fitted with the paddle attachment, combine the oil and sugar on medium speed.
Add the eggs one at a time, mixing well after each addition.
With the mixer on low speed, add the food coloring.
Gradually add the flour mixture and buttermilk mixture to the batter, beginning and ending with the flour mixture. Scrape down the sides of the bowl as needed. Mix until just combined.
Divide the batter evenly among the prepared pans.
Bake for 25 to 30 minutes, or until the cakes are firm and a toothpick inserted into the center comes out clean.
Allow the cakes to cool in the pans on a wire rack for 5 minutes.
Invert the cakes onto the rack to cool completely.
In the bowl of a heavy-duty mixer fitted with the paddle attachment, cream together the cream cheese and butter on medium speed until smooth.
Sift the confectioners' sugar over the cream cheese mixture and beat until light and fluffy.
Have you ever tasted a cake so moist and velvety, it practically melts in your mouth? Aunt Louise’s Red Velvet Cake is just that - a delightfully rich and decadent dessert that has become a family favorite. In this article, we will explore the history and secrets behind this beloved cake, as well as provide answers to some common questions about baking it.
Legend has it that Aunt Louise, a renowned baker in her community, created this iconic cake during the Great Depression. The vibrant red color was a symbol of hope and cheer in those challenging times. Aunt Louise’s Red Velvet Cake quickly gained popularity, and it has been passed down through generations, bringing joy to countless celebrations.
What sets Aunt Louise’s Red Velvet Cake apart is its unparalleled moisture. The secret lies in the combination of buttermilk and vinegar, which react with the cocoa powder and baking soda to create a tender and moist crumb. The result is a cake that stays fresh for days, making it perfect for special occasions.
No discussion about Aunt Louise’s Red Velvet Cake is complete without mentioning the luscious cream cheese frosting. Its tangy sweetness perfectly complements the rich cocoa flavor of the cake, creating a harmonious balance of taste and texture. Each bite is a heavenly experience that will leave you craving more.
Baking Aunt Louise’s Red Velvet Cake is a labor of love, but the end result is well worth the effort. The recipe begins with blending the dry ingredients - flour, cocoa powder, and salt - in a bowl. In a separate bowl, cream the butter and sugar until light and fluffy. Next, add the eggs one at a time, followed by the vanilla extract and red food coloring. Alternating between the dry ingredients and buttermilk mixture, gradually incorporate them into the batter. Finally, combine the vinegar and baking soda, and gently fold it into the batter. Bake in a preheated oven until a toothpick inserted into the center comes out clean.
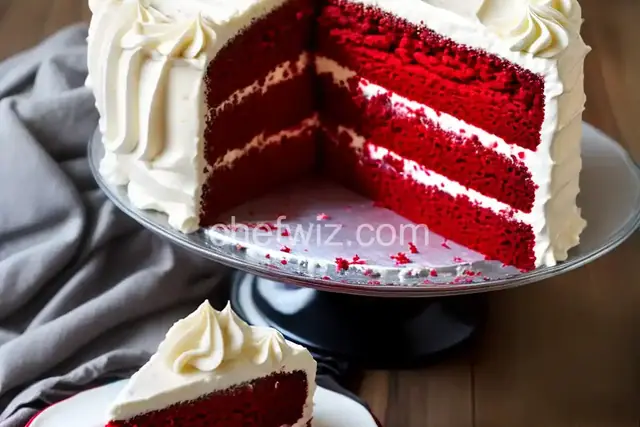
Once the cake has cooled, it's time to let your creativity shine. You can choose to frost the entire cake with the cream cheese frosting, or create a stunning layered effect by frosting each layer individually. For a finishing touch, you can decorate the cake with chocolate shavings, fresh berries, or even edible flowers. The possibilities are endless!
Aunt Louise’s Red Velvet Cake is more than just a dessert - it's a symbol of love and celebration. Its rich history, secret ingredients, and heavenly taste make it a standout treat for any occasion. So roll up your sleeves, gather your ingredients, and let Aunt Louise’s Red Velvet Cake become a cherished part of your family's traditions.
While buttermilk is a key ingredient in achieving the cake's signature texture and flavor, you can make a simple substitute by combining regular milk with lemon juice or vinegar.
To keep the cake fresh, store it in an airtight container in the refrigerator. Allow it to come to room temperature before serving to enhance its flavor and texture.
Absolutely! Wrap the cake tightly in plastic wrap and place it in the freezer. When ready to enjoy, thaw it in the refrigerator overnight and bring it to room temperature before serving.
While Dutch-processed cocoa powder is traditionally used in red velvet cakes, you can substitute it with natural cocoa powder. Just keep in mind that the color of the cake may be slightly less vibrant.
Yes, you can! Simply replace the all-purpose flour with a gluten-free flour blend of your choice. Be sure to check that all other ingredients, such as the cocoa powder and baking soda, are also gluten-free.
When stored properly, Aunt Louise’s Red Velvet Cake can stay fresh for up to five days. However, it is so delicious that it rarely lasts that long!
Absolutely! The recipe can be easily adapted to make cupcakes. Simply adjust the baking time accordingly, and you'll have delightful red velvet cupcakes ready to enjoy.
Of course! Feel free to add chopped nuts, chocolate chips, or even a swirl of peanut butter to customize your Aunt Louise’s Red Velvet Cake. Get creative and make it your own!
AprilCook, recipe developer and the heart of Chefwiz. More about April