Roasting a chicken to perfection requires careful timing. The cooking time for a chicken depends on its weight, typically ranging from 1-2 kg. A 1kg bird or smaller needs to be roasted for about 1 hour at 200C/180C fan/gas 6. Larger birds can take up to 1 hour 40 minutes. It’s important to note that different types of chickens may have slightly varied cooking times, so it’s best to consult with your supplier for specific roasting instructions.
Key Takeaways:
- Roasting time for a chicken depends on its weight.
- A 1kg bird or smaller needs about 1 hour at 200C/180C fan/gas 6.
- Larger birds can take up to 1 hour 40 minutes.
- Consult with your supplier for specific roasting instructions.
- Use a meat thermometer to ensure the chicken reaches the desired doneness.
Step 1: Gather Tools and Ingredients
Before you embark on roasting the perfect chicken, it’s important to gather all the necessary tools and ingredients. Here’s a checklist of everything you’ll need:
- A chicken
- Paper towels
- Large-grain salt
- Pepper
- A clean surface to work on
- Kitchen twine
- An oven-proof pot
- A meat thermometer
- Soap and water for cleaning
- Bleach for sanitizing
- A sharp knife or kitchen shears
Preparation is key to achieving the perfect roast chicken, so make sure you have all these items ready before you start the cooking process. Having everything at hand will make the experience smoother and more enjoyable.
Why it matters:
Gathering the right tools and ingredients before you begin roasting a chicken ensures that you have everything you need within reach. This saves you time and helps you maintain a smooth workflow in the kitchen. For example, having a meat thermometer allows you to accurately monitor the internal temperature of the chicken, ensuring it’s cooked thoroughly. Additionally, having a sharp knife or kitchen shears makes it easier to truss the chicken and carve it later.
By being prepared and organized, you set yourself up for success in creating a delicious and perfectly roasted chicken.
Step 2: Preheat Oven and Pan
Before you begin roasting your chicken, it’s important to preheat your oven and pan. This step is crucial to ensure even cooking and achieve that perfect roast chicken. Preheating the oven and pan helps to create a crispy skin and allows for better heat distribution during the cooking process.
To start, set your oven temperature to 450F (232C) and allow it to preheat fully. While the oven is heating up, place your pan inside the oven to heat as well. Heating the pan beforehand helps to sear the chicken as soon as it hits the hot surface, locking in the flavors and creating a delicious crust.
By preheating both the oven and the pan, you are setting the stage for a successful roast chicken. It ensures that the chicken cooks evenly from all sides and produces a golden brown, crispy exterior.
Step 3: Dry Chicken
Drying the chicken thoroughly is an essential step in achieving the perfect roast chicken with crispy skin. Excess moisture on the chicken can hinder the desired texture and hinder the browning process. To dry the chicken, take a few pieces of paper towel and carefully pat the chicken inside and out. Pay special attention to the body cavity, ensuring it is as dry as possible. Removing any excess moisture will allow the skin to crisp up beautifully during the cooking process.
Pro Tip: For an extra-dry surface, you can leave the chicken uncovered in the refrigerator overnight. This technique draws out even more moisture, resulting in an even crispier skin.
With a dry chicken, you’re now ready to move on to the next step and enhance the flavor of your roast chicken.
Why Drying the Chicken is Important
“Drying the chicken is crucial to achieving that coveted crispy skin. Moisture on the surface of the chicken creates steam during the cooking process, preventing the skin from crisping up. By thoroughly drying the chicken, you’re removing any excess moisture and setting the stage for a beautifully browned and delicious roast chicken.”
How to Dry the Chicken Effectively
To ensure the best results, follow these steps to dry your chicken effectively:
- Start with a clean and dry chicken.
- Use paper towels to pat the chicken dry inside and out.
- Pay extra attention to the body cavity, ensuring it is as dry as possible.
- For an even drier surface, leave the chicken uncovered in the refrigerator overnight. This step is optional but can result in an extra crispy skin.
Benefits of Drying the Chicken
Drying the chicken before roasting offers several benefits:
- Creates a crispy and golden-brown skin.
- Enhances the overall texture and taste of the chicken.
- Allows the skin to render its fat, resulting in a flavorful and juicy meat.
| Step | Dry Chicken |
|---|---|
| Objective | To remove excess moisture from the chicken surface |
| Materials Needed | Paper towels |
| Instructions |
|
Step 4: Salt Body Cavity
Seasoning the body cavity of the chicken with salt enhances the flavor and helps to tenderize the meat. Pour about a teaspoon of salt into the cavity and rub it against the insides. Any extra salt can be discarded.
Salting the body cavity of the chicken is an essential step in the roasting process. The salt not only adds flavor to the meat but also helps in breaking down the protein, resulting in a more tender and juicy chicken. Make sure to distribute the salt evenly inside the cavity, ensuring that every part of the chicken is adequately seasoned.
“Salting the body cavity of the chicken is a crucial technique that can make a significant difference in the taste and texture of the final dish. The salt penetrates the meat, bringing out its natural flavors and creating a moist and succulent roast chicken.”
Why salt the body cavity?
By salting the body cavity, the salt molecules seep into the meat, enhancing its natural flavors and breaking down the proteins, resulting in a more tender and juicy roast chicken. This method of seasoning not only adds depth to the taste but also helps to retain moisture during the cooking process, preventing dryness in the final dish.
Table:
| Benefits of Salting the Body Cavity | Effect on Chicken |
|---|---|
| Enhances flavor | Brings out the natural taste of the meat |
| Tenderizes the meat | Breaks down proteins for a more tender texture |
| Retains moisture | Prevents dryness and adds juiciness to the chicken |
| Improves overall taste | Creates a well-seasoned and delicious roast chicken |
Adding salt to the body cavity is a simple yet effective technique that can elevate your roast chicken to new levels. Make sure to follow this step to enhance the flavor, texture, and overall enjoyment of your meal.

Step 5: Truss Chicken
Trussing the chicken is an important step in achieving a perfectly roasted bird. Trussing involves tying the chicken with kitchen twine to create a uniform shape, promote even cooking, and help retain moisture, resulting in juicier meat. To truss the chicken:
- Place the chicken breast-side up on a clean surface.
- Fold the wings back and tuck them under the bird.
- Take a piece of kitchen twine and loop it around the legs, crossing the twine and pulling it tight to secure the legs together.
- Tie the twine securely, making sure the legs are close to the body.
- Trim any excess twine, leaving a neat trussed chicken ready for roasting.
Trussing the chicken not only helps with the cooking process but also adds a visually appealing touch to your roast chicken presentation.
Pro Tip:
For added flavor and aroma, consider stuffing the body cavity of the trussed chicken with herbs, lemon slices, onions, or garlic cloves. This will infuse the meat with delicious flavors as it roasts, enhancing the overall taste of the chicken.
| Trussing Benefits | Trussing Tips |
|---|---|
|
|
With the chicken trussed and ready for the oven, it’s time to move on to the next step of the roasting process.
Step 6: Salt and Pepper Chicken
Once the chicken is dried and trussed, it’s time to season the exterior. This step adds flavor and enhances the overall taste of the roast chicken. Start by grinding fresh pepper over the surface of the chicken, ensuring an even distribution. Next, cover the chicken in a light rain of salt. The salt will not only enhance the flavor but also help to crisp up the skin during the roasting process. Feel free to add any additional desired spices or herbs at this stage to further customize the taste profile of your roast chicken.

Pro tip: If you’re looking for extra crispy skin, you can try a couple of techniques. One method is to roast the chicken until it’s almost cooked, then increase the oven temperature to 220°C and continue cooking for an additional 15-20 minutes. This will help to ensure that the skin reaches a delicious golden crispness. Another option is to salt the chicken and let it sit uncovered in the refrigerator overnight. This draws out moisture, resulting in a crisper skin when roasted.
Expert tip:
“The key to perfectly seasoned roast chicken is to be generous with the salt and pepper. Don’t be afraid to really coat the chicken, as this will ensure that the flavors penetrate the meat and create a delicious crust on the outside.”
Now that the chicken is properly seasoned, it’s time to move on to the next step: dropping it into the hot pan for roasting.
Step 7: Drop Into Hot Pan
Now that everything is prepared, it’s time to move on to the next step in roasting your perfect chicken. With the oven preheated and the pan hot, it’s crucial to handle the chicken with care as you drop it into the pan. Take a moment to appreciate the sizzling sound that signifies the start of the cooking process.
Position the trussed and seasoned chicken breast-side up in the hot pan, ensuring that it is laid out evenly for even cooking. Be cautious of any splattering as the chicken makes contact with the hot pan. This step is essential to creating a deliciously crispy and golden exterior, while the inside cooks to juicy perfection.
Now that the chicken is in the oven, you can sit back and let it work its magic. Resist the temptation to open the oven frequently, as this can cause heat loss and affect the cooking time. Instead, rely on a meat thermometer to ensure the chicken is cooked through. Let’s move on to the next step to learn more about cooking times and temperatures.
Table: Cooking Times for Roasting Chicken
| Weight of Chicken | Roasting Time |
|---|---|
| 1 kg or smaller | Approximately 1 hour at 200C/180C fan/gas 6 |
| 1-2 kg | Approximately 1 hour 40 minutes at 200C/180C fan/gas 6 |
| Above 2 kg | Approximately 2 hours or more at 200C/180C fan/gas 6 |
“Position the trussed and seasoned chicken breast-side up in the hot pan, ensuring that it is laid out evenly for even cooking.”
“Be cautious of any splattering as the chicken makes contact with the hot pan. This step is essential to creating a deliciously crispy and golden exterior, while the inside cooks to juicy perfection.”
“Now that the chicken is in the oven, you can sit back and let it work its magic. Resist the temptation to open the oven frequently, as this can cause heat loss and affect the cooking time.”
Step 8: Cook
Once your chicken is prepped and ready, it’s time to cook it to perfection. The cooking time for a roast chicken can vary depending on its weight, so it’s important to keep an eye on it to ensure it’s not over or undercooked. A general guideline is to cook the chicken at 450F for approximately 45 minutes. However, it’s crucial to use a meat thermometer to determine the doneness of the chicken. Insert the thermometer into the fleshy part between the thigh and body, and remove the chicken from the oven when it reaches a reading of 155F. The temperature will continue to rise to about 165F as it rests, ensuring that the chicken is cooked thoroughly.
While cooking times may vary, using a meat thermometer is the most accurate way to determine when your chicken is done. It’s essential to avoid undercooking the chicken, as it can lead to potential health risks, and overcooking can result in dry and tasteless meat. By following the recommended cooking time and using a meat thermometer, you can achieve a perfectly cooked roast chicken every time.
During the cooking process, it’s important to resist the temptation to open the oven door frequently. Every time the oven is opened, the temperature drops, prolonging the cooking time and affecting the final result. Trust the process and allow the chicken to cook undisturbed until it reaches the desired internal temperature.
| Weight of Chicken | Cooking Time |
|---|---|
| 1kg or smaller | Approximately 45 minutes at 450F |
| 1-2kg | Approximately 1 hour to 1 hour 40 minutes at 450F |
Step 9: Finish and Serve
After removing the chicken from the oven, baste the top with pan drippings for added flavor. If desired, add fresh herbs to the pan drippings and let them steep before basting. Let the chicken rest for about 10 minutes before carving and serving. The resting period allows the juices to redistribute, resulting in tender and juicy meat.
During the resting period, you can take this time to prepare any side dishes or sauces to accompany your roast chicken. Whether it’s creamy mashed potatoes, roasted vegetables, or a tangy cranberry sauce, the possibilities are endless! The succulent aroma of the chicken will surely whet your appetite, and your family and friends will eagerly gather around the table, eagerly awaiting their share of this delectable dish.
When it’s time to carve the chicken, make sure to use a sharp knife or kitchen shears for easy and precise cuts. Begin by removing the twine and then carefully separate the legs and wings from the body. Next, slice along the breastbone to separate the two halves. Serve the chicken on a platter, garnished with fresh herbs and accompanied by your chosen side dishes. Take pride in presenting a beautifully roasted chicken that is not only visually appealing but also incredibly flavorful.
| Side Dish Ideas: |
|---|
| 1. Creamy Mashed Potatoes |
| 2. Roasted Vegetables |
| 3. Tangy Cranberry Sauce |
| 4. Crispy Brussels Sprouts |
| 5. Garlic Butter Green Beans |
“A perfectly roasted chicken is a culinary masterpiece that brings people together. The combination of crispy skin, succulent meat, and flavorful pan drippings is hard to resist. So take your time, follow the steps, and savor the delicious results. Your taste buds will thank you!”
Tips for Crispy Skin and Flavorful Chicken
Roasting a chicken to perfection requires more than just the right cooking time. If you’re aiming for crispy skin and flavorful meat, here are some tips to take your roast chicken to the next level:
Roast Until Almost Cooked, Then Increase Temperature
If you want extra crispy skin, try this technique: roast the chicken until it’s almost cooked through, and then increase the oven temperature to 220C/200C fan/gas 7 for an additional 15-20 minutes. The higher heat will help achieve a beautifully browned and crispy exterior.
Salt and Refrigerate Overnight
To enhance the crispiness of the skin, you can also consider salting the chicken and letting it sit uncovered in the refrigerator overnight. The salt draws out moisture from the skin, resulting in a drier surface that crisps up nicely during roasting.
Separate and Pan-Fry the Skin
If you’re a fan of indulgent treats, try removing the skin after roasting and pan-frying it separately. This method will give you a super crispy and delicious snack that can be served alongside the roast chicken or enjoyed on its own. Just be aware that it adds extra time and effort to the cooking process.
| Tip | Description |
|---|---|
| Salt the chicken | Seasoning the chicken with salt helps enhance the flavor and tenderize the meat. |
| Truss the chicken | Tying the chicken with kitchen twine promotes even cooking and juicier meat. |
| Roast at high temperature | Starting with a higher oven temperature helps create a crispy skin. |
| Let the chicken rest | Allowing the chicken to rest before carving helps the juices redistribute and keeps the meat moist. |
By following these tips and techniques, you can achieve roast chicken with irresistibly crispy skin and juicy, flavorful meat. Experiment with different methods and flavors to find your perfect roast chicken recipe that will impress your guests every time.
Flavoring Options for Roast Chicken
Roast chicken is a versatile dish that can be customized to suit your taste preferences. While salt and pepper are classic seasonings, there are many other flavors and spices you can experiment with to enhance the taste of your roast chicken.
Spice rubs: Create a flavorful spice rub by combining herbs, spices, and seasoning. Common ingredients include paprika, garlic powder, onion powder, dried herbs like thyme or rosemary, and chili powder for a kick of heat. Massage the spice rub onto the chicken before roasting for a deliciously seasoned crust.
Flavored butter: Another option is to make a flavored butter to rub under the skin of the chicken. Mix softened butter with minced garlic, chopped herbs like parsley or tarragon, lemon zest, or even a touch of honey for a sweet and savory twist. The butter will melt as the chicken roasts, infusing it with rich flavors.
Stuffed cavity: For added aroma and taste, consider stuffing the chicken cavity with aromatic ingredients like fresh herbs, lemon slices, or even onions. As the chicken cooks, these ingredients release their flavors, imparting a fragrant and delicious essence to the meat.

With these flavorful options, you can elevate your roast chicken from a simple dish to a culinary masterpiece. Whether you prefer a spicy kick, a burst of herbal freshness, or a combination of different flavors, there are endless possibilities to explore. Get creative and experiment with different seasonings to find your perfect roast chicken recipe.
Basic Recipe for Foolproof Roast Chicken
Roasting a chicken to perfection doesn’t have to be complicated. With a simple recipe and a little bit of time, you can create a flavorful and juicy roast chicken that will impress your family and friends. Here’s a basic recipe that guarantees foolproof results every time.
Step 1: Gather your ingredients and tools. You’ll need a chicken, butter, salt, pepper, and any additional herbs or spices you prefer for seasoning. You’ll also need a roasting pan, kitchen twine, and a meat thermometer for checking the doneness of the chicken.
Step 2: Preheat your oven to 200C/180C fan/gas 6. While the oven is heating, prepare your chicken by removing any giblets and excess fat from the cavity. Pat the chicken dry with paper towels, then rub it all over with softened butter. Season generously with salt and pepper, making sure to get some under the skin for extra flavor.
Step 3: Place the chicken breast-side up in a roasting pan and tie the legs together with kitchen twine. This helps the chicken cook evenly and keeps everything in place. Insert a meat thermometer into the thickest part of the thigh, being careful not to touch the bone.
Step 4: Roast the chicken in the preheated oven for about 1 hour, or until the internal temperature reaches 165F. Baste the chicken with pan juices every 20 minutes to keep it moist and flavorful. Once the chicken is cooked, remove it from the oven and let it rest for at least 10 minutes before carving. This allows the juices to redistribute and ensures tender and succulent meat.
Follow these simple steps, and you’ll have a perfectly cooked roast chicken that’s juicy, flavorful, and sure to be a hit at your next meal. Get creative with your seasonings and add your own personal touch to make it a dish uniquely yours. Enjoy!
Conclusion
Roasting a chicken is a culinary art that requires precise timing and attention to detail. Knowing how long to roast a chicken is key to achieving a mouthwatering meal. By following the recommended cooking times based on the weight of the bird and using an oven thermometer to ensure proper doneness, you can enjoy a perfectly roasted chicken every time.
During the cooking process, the chicken’s skin becomes beautifully golden and crispy, while the meat inside remains juicy and flavorful. The combination of seasoning the body cavity, trussing the chicken, and adding salt and pepper creates a delicious taste profile that will have your taste buds craving more.
Remember to let the chicken rest before carving and serving to allow the juices to redistribute, resulting in tender and succulent meat. With a little practice and experimentation with different flavors, you can find your own signature roast chicken recipe that will impress your family and friends.
FAQ
How long do you roast a chicken?
The cooking time for a chicken depends on its weight. A general guideline is to roast a 1kg chicken or smaller for about 1 hour at 200C/180C fan/gas 6. Larger birds can take up to 1 hour 40 minutes. It’s always best to consult with your supplier for specific roasting instructions.
What tools and ingredients do I need to roast a chicken?
You will need a chicken, paper towels, large-grain salt, pepper, kitchen twine, an oven-proof pot, a meat thermometer, soap and water for cleaning, bleach for sanitizing, and a sharp knife or kitchen shears.
Do I need to preheat the oven and pan before roasting the chicken?
Yes, preheating the oven to 450F and placing the pan inside to heat is important for creating a crispy skin and ensuring even cooking.
Should I dry the chicken before roasting?
Yes, thoroughly drying the chicken with paper towels helps to achieve crispy skin. Be sure to remove any excess moisture before proceeding with the next steps.
How do I season the body cavity of the chicken?
Pour about a teaspoon of salt into the cavity and rub it against the insides. Any extra salt can be discarded.
Why should I truss the chicken?
Trussing the chicken helps to create a uniform shape, promote even cooking, and result in juicier meat. It’s best to securely tie the chicken’s legs and wings using kitchen twine.
How do I season the exterior of the chicken?
Season the exterior of the chicken with salt, pepper, and any additional desired spices or herbs. Grind fresh pepper over the surface and cover it with a light rain of salt.
How long do I cook the chicken?
A general guideline is to cook the chicken at 450F for approximately 45 minutes. However, it’s crucial to use a meat thermometer to determine the doneness. Remove the chicken from the oven when it reaches a reading of 155F in the fleshy part between the thigh and body.
Should I baste the chicken after roasting?
Yes, basting the top of the chicken with pan drippings after roasting adds flavor. You can also add fresh herbs to the pan drippings for extra taste.
How long should I let the chicken rest before carving and serving?
Let the chicken rest for about 10 minutes. This allows the juices to redistribute, resulting in tender and juicy meat.
What can I do to achieve extra crispy skin?
You can try increasing the oven temperature for the last 15-20 minutes of cooking or salt the chicken and let it sit uncovered in the refrigerator overnight to draw out moisture. Pan-frying the skin separately after roasting can also create a crispy snack.
Can I experiment with different flavors for the roast chicken?
Absolutely! While salt and pepper are classic seasonings, you can try adding a spice rub, flavored butter, or stuffing the chicken cavity with herbs, lemon, or onions for added aroma and taste.
Can you share a basic roast chicken recipe?
Rub butter under the chicken’s skin, season with salt and pepper, and roast at 200C/180C fan/gas 6 for 1 hour. Remove the foil and continue roasting until the skin is golden and the chicken is fully cooked. Allow the chicken to rest before carving and serving.
Source Links
- https://downshiftology.com/recipes/easy-roast-chicken/
- https://www.bbcgoodfood.com/videos/techniques/how-roast-chicken-video
- https://www.instructables.com/Quick-Roast-Chicken/
Related Recipes:
 How to Cook Bottom Round Roast (Easy Step-by-Step Guide)
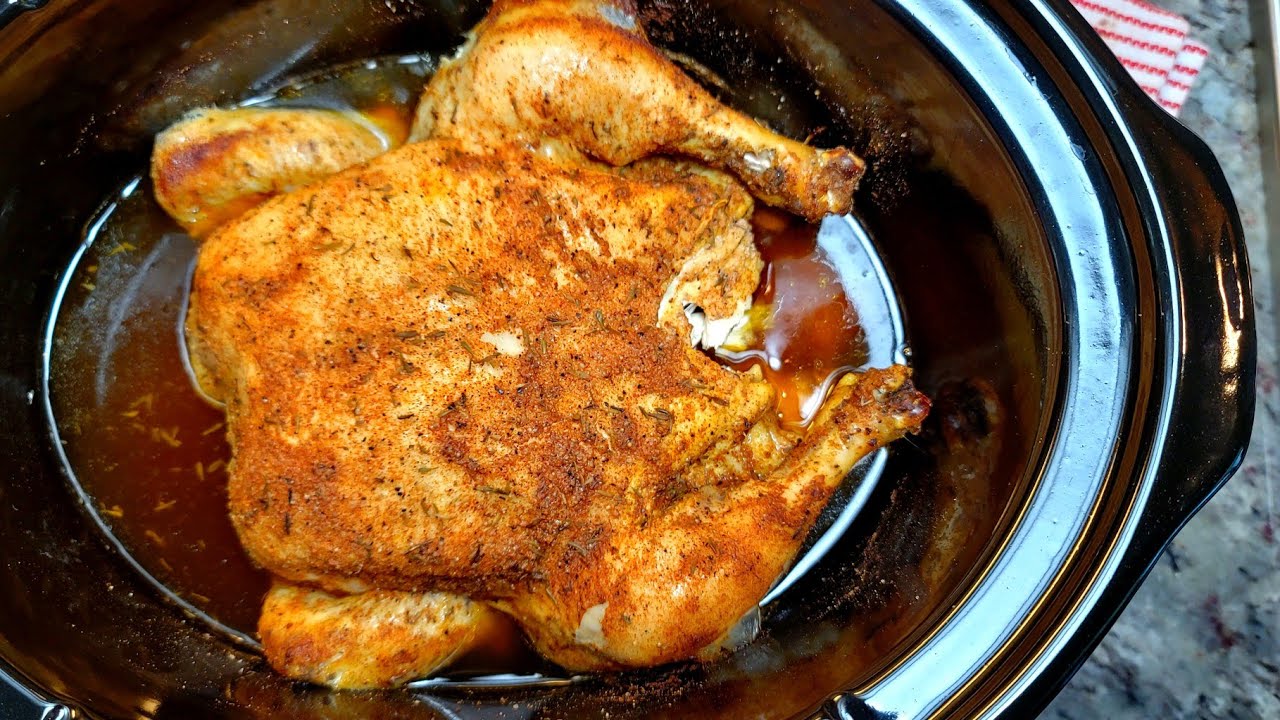
 Savory Whole Chicken Crock Pot Recipe You’ll Love!
 Mastering the Kitchen: What are the 5 Basic Cooking Skills?
 How to Cook Soy Curls? (Awesome Step-By-Step Guide)
 How to Cook Beets? (Perfect Step-By-Step Guide)
 How to Blanch Tomatoes? (Perfect Step-By-Step Guide)
 How to Cook Air Fryer Potatoes? (Perfect Step-By-Step Guide)
 How to Cook Asparagus? (5-Way Step-By-Step Guide)


