Mom's Super Thin and Crispy Chicken Cutlets
Rate this recipeBe the first to rate
 By AprilPublished
 Who doesn't love a perfectly crispy chicken cutlet? The kind that's so thin and delicate, it practically melts in your mouth?
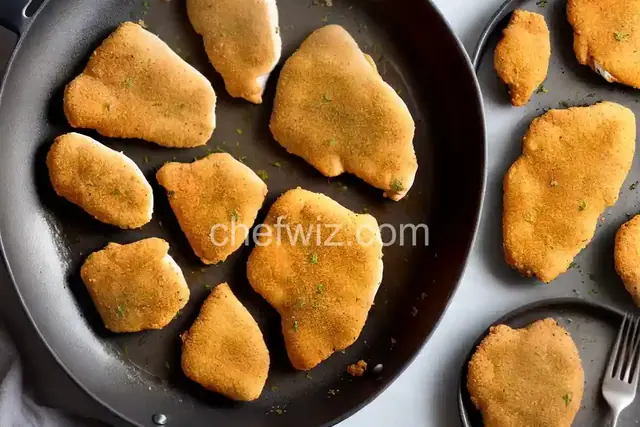 By AprilPublished
 Who doesn't love a perfectly crispy chicken cutlet? The kind that's so thin and delicate, it practically melts in your mouth?
In a shallow bowl, beat the eggs with 1 tablespoon of water. Set aside for frying later.
Use a food processor to pulse the breadcrumbs, parsley, pecorino, granulated garlic, and salt until they are just mixed together. Transfer the breadcrumb mixture to a shallow dish.
Cut the chicken breasts in half crosswise. Place a piece of chicken between two pieces of plastic wrap on a sturdy cutting board. Use a mallet or other blunt object to pound the chicken until it becomes a flat piece about 1/8-inch to 1/4-inch thick. Repeat this step with the remaining chicken.
In a 14-inch cast-iron pan, heat 1 cup of olive oil with the garlic cloves until it reaches a temperature of 350 degrees F. Prepare a sheet tray with a wire rack.
Set up an assembly line. Dip each cutlet into the beaten egg and then into the breadcrumb mixture for coating. For extra crispy coating, repeat this process by dipping the cutlet back into the egg wash and then into the breadcrumbs again. Place the first breaded chicken piece into the preheated oil along with 1/2 stick of butter. Once the butter is mostly melted, add another piece of chicken. Fry until the internal temperature of the chicken reaches 160 degrees F, which takes about 2 to 3 minutes on each side. Add more oil and butter to the pan as needed, making sure to
Who doesn't love a perfectly crispy chicken cutlet? The kind that's so thin and delicate, it practically melts in your mouth? Well, you're in luck because today, I'm going to share with you the secret to making my mom's super thin and crispy chicken cutlets. These cutlets are so delicious, they'll have you coming back for seconds, thirds, and maybe even fourths!
So what's the secret to achieving that perfect thin and crispy texture? It all starts with the preparation. You'll want to use boneless, skinless chicken breasts and pound them until they're about a quarter-inch thick. This not only helps to tenderize the meat but also ensures that it cooks evenly and quickly.
Once you've pounded the chicken breasts, it's time to season them. I like to keep it simple with just salt and pepper, but feel free to get creative and add your favorite herbs and spices. The key here is to let the flavors of the chicken shine through, so don't go overboard with the seasoning.
Now comes the fun part – breading the chicken! You'll need three shallow dishes – one for flour, one for beaten eggs, and one for breadcrumbs. The flour helps to create a dry surface for the eggs to adhere to, while the breadcrumbs add that satisfying crunch.
Start by coating each chicken cutlet in the flour, shaking off any excess. Then dip it into the beaten eggs, making sure it's coated on all sides. Finally, press the cutlet into the breadcrumbs, ensuring an even coating. Repeat this process for all the cutlets.
Now that your chicken cutlets are perfectly breaded, it's time to cook them up. Heat a generous amount of oil in a large skillet over medium-high heat. You want enough oil to cover the bottom of the pan, so the cutlets can fry evenly.
Carefully place the breaded cutlets into the hot oil, making sure not to overcrowd the pan. Cook them for about 2-3 minutes on each side, or until they're golden brown and crispy. You may need to adjust the heat slightly to prevent them from burning.
Once your chicken cutlets are perfectly cooked, it's time to serve and enjoy them. I like to serve mine with a squeeze of fresh lemon juice and a sprinkle of chopped parsley. The acidity of the lemon cuts through the richness of the chicken, while the parsley adds a pop of freshness.
These super thin and crispy chicken cutlets are perfect on their own, but they also make a delicious addition to sandwiches, salads, and pasta dishes. The possibilities are endless!
In conclusion, my mom's super thin and crispy chicken cutlets are a true crowd-pleaser. With their delicate texture, flavorful seasoning, and satisfying crunch, they're sure to become a family favorite. So why not give them a try? Your taste buds will thank you!
Yes, you can definitely use chicken thighs instead of chicken breasts. Just keep in mind that thighs may require a slightly longer cooking time.
Absolutely! You can bread the chicken cutlets ahead of time and refrigerate them until you're ready to cook. Just make sure to place them in a single layer to prevent the breading from getting soggy.
While frying is the traditional method for achieving that crispy texture, you can certainly bake these chicken cutlets. Just preheat your oven to 425°F (220°C) and bake them for about 20-25 minutes, or until they're golden brown and cooked through.
Yes, you can freeze these chicken cutlets. Once they're fully cooked, let them cool completely, then place them in an airtight container or freezer bag. They can be frozen for up to 3 months. To reheat, simply bake them in a preheated oven at 375°F (190°C) for about 15-20 minutes, or until heated through.
These chicken cutlets pair well with a variety of sides, such as mashed potatoes, roasted vegetables, or a fresh salad. They're also great for making chicken parmesan or chicken sandwiches.
Yes, you can use gluten-free breadcrumbs if you prefer. There are many gluten-free breadcrumb options available in most grocery stores.
Yes, you can definitely use an air fryer to cook these chicken cutlets. Just follow the manufacturer's instructions for cooking times and temperatures.
While this recipe is specifically tailored for chicken, you can certainly use the same breading and cooking method for other types of meat, such as pork or veal cutlets.
AprilCook, recipe developer and the heart of Chefwiz. More about April