Cake Pops
Rate this recipeBe the first to rate
 By AprilPublished
 Who doesn't love the feeling of biting into a sweet treat that's both adorable and delicious?
 By AprilPublished
 Who doesn't love the feeling of biting into a sweet treat that's both adorable and delicious?
Follow the instructions on the cake package for a 9-by-13-inch pan and bake the cake. Allow it to cool completely.
Break the cooled cake into pieces and place them in a food processor. Add the frosting and process until the mixture forms a ball and no longer sticks to the sides of the bowl (about 30 seconds). If needed, add additional frosting 1 tablespoon at a time until the mixture holds its shape.
Use a 3/4-ounce scoop to shape the mixture into 46 balls. Place the balls on a baking sheet and refrigerate for approximately 30 minutes, or until firm.
While the cake balls are chilling, heat the candy wafers according to the instructions on the package in a microwave-safe bowl. Stir until melted and smooth.
Take a lollipop stick and dip half an inch of the tip into the melted candy. Insert the candy-coated tip halfway into a cake ball. Repeat this step with the remaining cake balls and sticks. Refrigerate the cake pops for about 1 hour, or until completely chilled.
Microwave the candy again until melted and pour it into a tall, narrow glass.
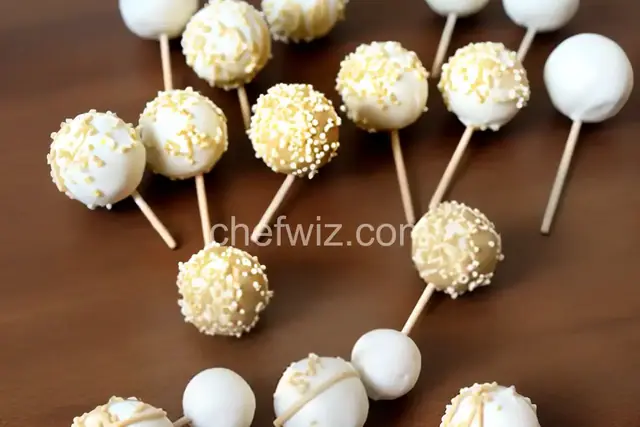
Dip each cake pop into the melted candy, allowing any excess to drip off. If desired, sprinkle the wet coating with decorative sprinkles while the candy is still wet.
Place the finished cake pops in two 9.8-by-11.8-inch Styro
Who doesn't love the feeling of biting into a sweet treat that's both adorable and delicious? Cake pops, those bite-sized delights on a stick, have taken the dessert world by storm. With their unique presentation and endless flavor possibilities, these little wonders have become a staple at parties, weddings, and even everyday indulgences. But what exactly are cake pops, and why are they so irresistible?
Imagine the marriage of cake and lollipop—a match made in dessert heaven. Cake pops were first introduced by the talented baker and blogger, Bakerella, back in 2008. These tiny treats quickly gained popularity, capturing the hearts (and taste buds) of people worldwide.
The concept is simple yet brilliant. Crumbled cake mixed with frosting forms a moist and flavorful dough, which is then rolled into bite-sized balls. These little balls of heaven are then placed on a stick, dipped in a coating of your choice, and decorated to perfection. The end result? A delightful and visually appealing treat that's as fun to eat as it is to make.
One of the most exciting aspects of cake pops is the sheer variety of flavors you can create. From classic chocolate and vanilla to more adventurous options like red velvet or salted caramel, there's a cake pop flavor for every palate. Plus, you can mix and match cake flavors with different frostings and coatings, giving you an endless array of taste sensations.
Not only can you experiment with flavors, but you can also get creative with the decorations. Sprinkles, edible glitter, drizzles of chocolate, and even tiny fondant decorations can transform these little spheres into edible works of art. The only limit is your imagination!
Cake pops are not just a scrumptious treat; they're also a versatile dessert option for any occasion. Their small size and handheld nature make them ideal for parties and gatherings, as guests can easily grab one and enjoy without the need for plates or utensils. Whether it's a birthday party, a baby shower, or a wedding, cake pops add a touch of whimsy and elegance to any event.
Furthermore, cake pops can be customized to fit any theme or color scheme. With a little bit of creativity, you can transform these tiny treats into edible centerpieces that will wow your guests. They can even be individually wrapped and given as party favors, ensuring your guests take home a memorable and delicious memento.
Cake pops are the perfect combination of taste, creativity, and convenience. These adorable bite-sized treats have captured the hearts of dessert lovers all over the world. With their endless flavor possibilities and customizable designs, cake pops add a touch of whimsy to any occasion. So why not treat yourself and your loved ones to these delightful little wonders? Indulge in a cake pop and let your taste buds dance with joy.
Cake pops can last up to a week when stored properly in an airtight container in the refrigerator. However, they are best enjoyed within the first few days when they are freshest.
Absolutely! Cake pops are a great make-ahead dessert. You can make the cake balls in advance and freeze them. When you're ready to serve, simply thaw the cake balls, dip them in the coating, and decorate as desired.
Yes, you can use a box cake mix to make cake pops. Simply follow the instructions on the box to bake the cake, crumble it, and mix it with frosting to form the cake pop dough.
You can use candy melts, chocolate, or even colored white chocolate as the coating for your cake pops. Candy melts are specifically designed for cake pops and come in a variety of colors and flavors.
Absolutely! There are numerous vegan and gluten-free cake recipes available that can be used to make delicious and allergy-friendly cake pops. Simply substitute the necessary ingredients to accommodate dietary restrictions.
Cake pops are best stored in the refrigerator to maintain their freshness and texture. However, if you plan to serve them at room temperature, it's safe to leave them out for a few hours.
Make sure to dip the cake pop stick into the coating before inserting it into the cake ball. This will act as a "glue" and help secure the cake pop to the stick. Additionally, chilling the cake pops in the refrigerator or freezer before dipping can also help them stay intact.
While cake pops are traditionally shaped into balls, you can get creative with different molds to achieve different shapes. From hearts and stars to animals and characters, the possibilities are endless. Just make sure to adjust the baking time accordingly.
AprilCook, recipe developer and the heart of Chefwiz. More about April