Tunnel of Fudge Cake
Rate this recipeBe the first to rate
 By AprilPublished
 Who doesn't love a rich, chocolaty cake that oozes with gooey goodness?
 By AprilPublished
 Who doesn't love a rich, chocolaty cake that oozes with gooey goodness?
Prepare the filling: In a medium-sized pan, combine 1 1/2 cups of milk and the pudding mix. Cook according to the instructions on the package. Add chocolate chips and stir until they are melted. Set the mixture aside.
Preheat your oven to 350 degrees F (175 degrees C). Grease and flour a 10-inch Bundt or tube pan.
Prepare the cake batter: In a large bowl, mix together white sugar, butter, and shortening. Beat the mixture until it becomes light and fluffy. Add vanilla and eggs, and mix well.
In another bowl, combine flour, 1/2 cup of cocoa, baking powder, salt, and 1 cup of milk. Add this mixture to the bowl with the sugar, butter, and shortening. Beat on low speed until the ingredients are moistened. Then, beat on medium speed for 3 minutes. Stir in walnuts.
Set aside 2 cups of the batter. Pour the remaining batter into the prepared pan. Spoon the filling onto the batter in a ring shape, ensuring that it does not touch the sides of the pan. Spoon the reserved batter over the filling.
Bake the cake in the preheated oven for 50 to 60 minutes, or until the cake springs back when touched lightly in the center. Allow the cake to cool in the pan for 1 hour, then transfer it to a wire rack to cool
Who doesn't love a rich, chocolaty cake that oozes with gooey goodness? If you're a fan of indulgent desserts, then the Tunnel of Fudge Cake is a must-try. This heavenly creation will satisfy even the most insatiable sweet tooth. So, let's dive into the delightful world of the Tunnel of Fudge Cake and discover why it's a dessert lover's dream come true.
Just like any culinary masterpiece, the Tunnel of Fudge Cake has an interesting backstory. It gained popularity in the 1960s after winning second place in the prestigious Pillsbury Bake-Off contest. This rich, dense cake became an instant sensation, captivating the hearts and taste buds of dessert enthusiasts across the nation.
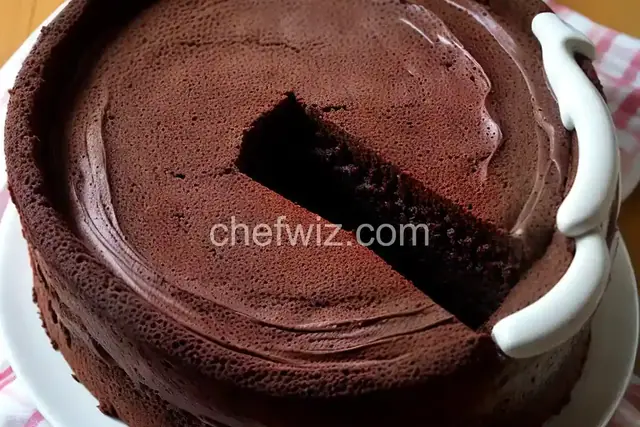
Imagine sinking your teeth into a moist, chocolatey cake with a surprise hidden inside. The Tunnel of Fudge Cake gets its name from the luscious fudge filling that runs through the center, creating a delightful tunnel of pure indulgence. With each bite, you'll experience a blissful combination of velvety cake and gooey fudge that will transport you to dessert heaven.
So, how does this decadent dessert achieve its fudgy center? The secret lies in the unique combination of ingredients. The cake batter contains a precise amount of cocoa, sugar, and nuts, which helps create the perfect tunnel of fudge. As the cake bakes, the outside forms a delectable crust, while the inside remains molten and fudgy, creating a textural contrast that's simply irresistible.
While making the Tunnel of Fudge Cake may seem daunting, with a few tips and tricks, you'll be able to achieve baking perfection. Here are some pointers to ensure your cake turns out marvelous:
The type of pan you use can significantly impact the outcome of your cake. It's best to use a Bundt pan, as it allows the cake to bake evenly and ensures the fudge filling is evenly distributed.
To achieve that gooey fudge center, it's crucial not to overbake your cake. Remember, the center should be slightly underdone when you remove it from the oven. This way, you'll get that perfect balance between a moist cake and a fudgy tunnel.
Patience is key when it comes to enjoying the Tunnel of Fudge Cake. Allow your cake to cool completely before removing it from the pan. This will prevent it from falling apart and ensure the fudge center stays intact.
The Tunnel of Fudge Cake is a dessert masterpiece that combines the best of both worlds - rich, chocolatey cake and a luscious fudge filling. Its unique texture and delightful flavors make it a favorite among dessert lovers everywhere. So, the next time you're craving something decadent, sink your teeth into this indulgent delight and let the Tunnel of Fudge Cake transport you to a world of pure dessert bliss.
While a Bundt pan is recommended for the best results, you can experiment with other cake pans. Just keep in mind that the texture and appearance may vary.
Absolutely! If you're not a fan of nuts or have allergies, feel free to leave them out. The cake will still be delicious without them.
Yes, you can freeze the cake for up to three months. Just make sure to wrap it tightly in plastic wrap and place it in an airtight container before freezing.
While the classic Tunnel of Fudge Cake uses a plain fudge filling, you can get creative and add flavors like peanut butter, caramel, or even mint to customize the cake according to your preferences.
The Tunnel of Fudge Cake should be stored in an airtight container at room temperature. It will stay fresh and delicious for up to three days.
Absolutely! You can make the cake a day in advance and store it in an airtight container. This way, you'll have a delightful dessert ready to enjoy whenever you want.
Yes, serving the Tunnel of Fudge Cake warm can enhance the fudgy texture and intensify the flavors. Simply microwave a slice for a few seconds or warm it in the oven before serving.
While the Tunnel of Fudge Cake is delicious on its own, you can certainly add a glaze or frosting if desired. A simple chocolate ganache or a dusting of powdered sugar can take this cake to the next level.
AprilCook, recipe developer and the heart of Chefwiz. More about April