The Tie Dye Cake
Rate this recipeBe the first to rate
 By AprilPublished
 Have you ever marveled at the mesmerizing colors of a tie-dye pattern?
 By AprilPublished
 Have you ever marveled at the mesmerizing colors of a tie-dye pattern?
Preheat the oven to 350 degrees F.
Butter three 9-inch round cake pans or line them with wax paper or parchment paper and butter the paper.
Divide the Classic Vanilla Cake batter evenly among 5 small bowls.
Add food coloring to each bowl--1 drop at a time--until the desired intensity of each color is reached.
Scoop each color into a disposable pastry bag and snip the tip of the bag.
Tie the ends of the pastry bags with plastic wrap or rubber bands to keep the batter in.
Pipe the batter into the first pan, one color at a time, one over the next. (You could also use a spoon, but the pastry bags make this much easier.)
Repeat with the remaining 2 pans.
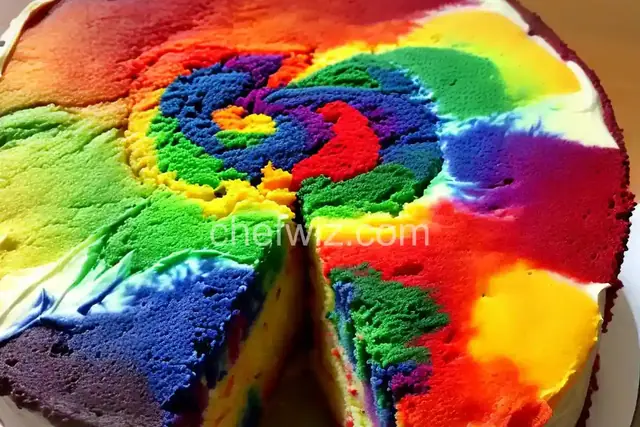
To make the tie dye effect, carefully drag a skewer completely through the batter from the center out to create a pattern with the colors. Don't overmix the colors.
Bake until the middle of the cake feels springy when you gently press your finger against it, 35 to 40 minutes.
Set the cakes aside to cool completely before icing.
Level the cakes with a serrated knife.
Place one layer on a cake turntable and frost the top with the Vanilla Icing.
Add the second cake layer and frost the top.
Place the third layer on top and cover the entire cake with a
Have you ever marveled at the mesmerizing colors of a tie-dye pattern? Imagine capturing that same vibrant burst of hues in a cake. Yes, you heard it right! The tie-dye cake is a delightful treat that combines the artistry of tie-dye with the deliciousness of a cake. In this article, we'll explore the magic behind creating this visually stunning dessert.
Creating a tie-dye cake is like being an artist in the kitchen. Just like a painter mixes colors on a palette, you'll be blending different shades of batter to achieve that perfect tie-dye effect. But before you dive into the creative process, let's understand the basics.
Every masterpiece begins with a solid foundation. The same goes for a tie-dye cake. You'll need a basic cake batter that acts as a canvas for your colorful creation. Think of it as a blank canvas waiting to be transformed into a work of art.
Now comes the fun part - adding color to your batter. Divide the batter into separate bowls and dye each one with different shades. You can use food coloring or natural alternatives like beetroot or matcha powder. Let your imagination run wild as you mix and match colors to create a captivating palette.
Once you have your colored batters ready, it's time to create the tie-dye effect. Pour the different batters into the cake pan in a random pattern, alternating colors as you go. Use a toothpick or a skewer to gently swirl the colors together, creating a beautiful blend of shades. Just like a tie-dye t-shirt, each slice of cake will reveal a unique pattern.
Creating a tie-dye cake requires a bit of finesse. Here are some tips to help you achieve a picture-perfect result:
Take your time while adding colors and swirling the batters. Rushing the process may result in a muddled mess instead of a stunning tie-dye pattern. Embrace the artistry and enjoy the journey.
Don't be afraid to get creative with your color choices. Mix primary colors to create secondary shades or opt for pastel tones for a softer look. The possibilities are endless, so let your inner artist shine.
When combining the colors, make sure not to overmix the batter. You want the colors to blend harmoniously, but not completely lose their individuality. A few gentle swirls are all you need.
The tie-dye cake is more than just a dessert; it's a canvas for your creativity. With a little imagination and a few basic ingredients, you can create a visually stunning masterpiece that will impress your friends and family. So, why settle for a plain cake when you can have a burst of color on your plate? Get ready to embark on a culinary adventure and indulge in the magic of the tie-dye cake.
Yes, absolutely! Natural food coloring options like beetroot or matcha powder work just as well and add a unique twist to your tie-dye cake.
While food coloring is the traditional choice, you can experiment with other natural alternatives like fruit juices or purees to achieve a similar effect.
Yes, you can use any type of cake batter as the base for your tie-dye cake. From classic vanilla to rich chocolate, the choice is yours.
The baking time will vary depending on the size and type of cake pan you use. It's best to follow the instructions provided in your chosen recipe.
Yes, you can freeze a tie-dye cake. Just make sure to wrap it tightly in plastic wrap or place it in an airtight container to prevent freezer burn.
No, the tie-dye cake tastes just as delicious as any other cake. The only difference lies in its visually stunning appearance.
Absolutely! The tie-dye technique works equally well for cupcakes. Simply divide the batter into individual cupcake liners and swirl the colors together.
Definitely! Once your tie-dye cake is baked and cooled, you can let your creativity shine by adding frosting, sprinkles, or even edible flowers for a finishing touch.
AprilCook, recipe developer and the heart of Chefwiz. More about April