Rustic Fruit Galette
Rate this recipeBe the first to rate
 By AprilPublished
 Are you ready to indulge in a dessert that is both rustic and elegant, delicious and simple?
 By AprilPublished
 Are you ready to indulge in a dessert that is both rustic and elegant, delicious and simple?
Preheat the oven to 400 degrees F (200 degrees C) and grease a baking sheet.
In a bowl, mix together apples, sugar, cornstarch, cinnamon, and vanilla extract.
Place the pie crust on the prepared baking sheet.
Spoon the apple mixture into the center of the crust, leaving a 2-inch border.
Fold the crust over the edges of the apple mixture.
Bake in the preheated oven for about 30 minutes, or until the apples are tender and the crust is golden.
Optional: You can substitute pears or peaches for the apples, if desired. Apple pie spice can be used instead of cinnamon, if desired.
Optional: You can also add 1/2 cup of blueberries, blackberries, or raspberries.
If you want to add extra sparkle, brush the crust with a glaze made of 1 egg white and 1 tablespoon water. Then sprinkle a teaspoon of sugar over the crust and fruit.
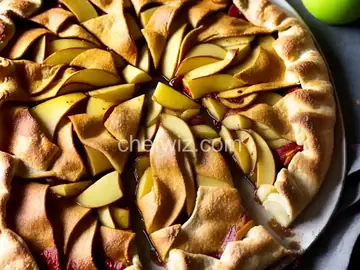
Are you ready to indulge in a dessert that is both rustic and elegant, delicious and simple? Look no further than the rustic fruit galette! This free-form tart is the perfect way to showcase the natural sweetness and beauty of fresh fruits. With its flaky crust and juicy filling, it's a dessert that will have your taste buds dancing with delight. So, let's dive into the world of galettes and discover how to create this mouthwatering treat!
Imagine a marriage between a pie and a tart, and you'll get a galette. Unlike its more refined counterparts, galettes embrace imperfections and celebrate simplicity. They are made with a single crust that is folded over the edges of the fruit filling, creating a rustic and charming appearance. Galettes are versatile and can be made with various fruits, making them a delightful dessert for any season.
The key to a delicious galette lies in the crust. It should be buttery, flaky, and melt-in-your-mouth. Achieving the perfect crust requires a delicate balance of ingredients and techniques. Imagine the satisfaction of biting into a galette with a crust that crumbles gently with each bite, complementing the sweetness of the fruit. To achieve this, use cold butter, ice water, and a light touch when mixing the dough. Don't be afraid to experiment with different flours for added flavor and texture.
The filling is where the magic happens. It's an opportunity to showcase the vibrant colors and flavors of your favorite fruits. Whether you prefer juicy peaches, tart apples, or tangy berries, the choice is yours. The secret to a successful filling is to strike the perfect balance between sweetness and acidity. A sprinkle of sugar, a squeeze of lemon juice, and a touch of spice can elevate the flavors and take your galette to the next level.
Assembling a galette is a joyful and creative process. Roll out your dough into a rustic round shape, leaving the edges slightly uneven for that charming homemade look. Arrange your fruit filling in the center, leaving a border around the edges. Then, gently fold over the edges of the dough, creating pleats as you go. The beauty of a galette is that it doesn't have to be perfect. Embrace imperfections and let your creativity shine.
As your galette bakes in the oven, your kitchen will be filled with the irresistible aroma of sweet fruits and buttery crust. The edges will turn golden brown, and the fruit filling will bubble with juiciness. The anticipation is almost unbearable! Once baked to perfection, allow your galette to cool slightly before slicing into it. Serve it warm with a scoop of vanilla ice cream or a dollop of whipped cream for the ultimate indulgence.
Indulging in a slice of rustic fruit galette is like taking a bite out of pure happiness. Its simplicity and charm make it a dessert that can be enjoyed year-round. So, gather your favorite fruits, roll up your sleeves, and let your creativity run wild. Whether you're a seasoned baker or a novice in the kitchen, the joy of creating a galette is an experience that will leave you craving for more. So go ahead, embrace imperfections, and savor the deliciousness of a homemade galette!
Absolutely! Frozen fruits work well in galettes. Just make sure to thaw and drain them before using to prevent excess moisture in the filling.
Yes! You can prepare the crust in advance and refrigerate it for up to 3 days. Just make sure to let it soften slightly at room temperature before rolling it out.
While homemade crust is recommended for the best flavor and texture, you can use a store-bought pie crust if you're short on time. Just follow the same assembly and baking instructions.
Absolutely! Spices like cinnamon, nutmeg, and cardamom can add warmth and depth of flavor to your galette. Experiment with different combinations to find your favorite.
Of course! You can use alternatives like honey, maple syrup, or coconut sugar to sweeten your fruit filling. Just keep in mind that the sweetness levels may vary, so adjust accordingly.
Definitely! Galettes aren't limited to sweet fillings. You can create savory galettes with ingredients like tomatoes, cheese, and herbs for a delightful appetizer or main course.
To prevent a soggy bottom, sprinkle some breadcrumbs or ground almonds on the crust before adding the fruit filling. They will absorb excess moisture and keep the crust crisp.
Yes, you can! Wrap the cooled galette tightly in plastic wrap or aluminum foil and store it in the freezer for up to 2 months. When ready to enjoy, thaw it in the refrigerator overnight, then reheat in a preheated oven until warmed through.
AprilCook, recipe developer and the heart of Chefwiz. More about April