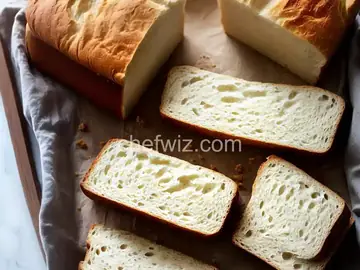
Pullman Loaf Recipe
Rate this recipeBe the first to rate
 By AprilPublished
 Have you ever wondered how bakeries achieve that tantalizing square shape of a Pullman loaf?
 By AprilPublished
 Have you ever wondered how bakeries achieve that tantalizing square shape of a Pullman loaf?
In the bowl of your stand mixer, combine water, semolina flour, honey, yeast, and bread flour. Stir well to mix everything together. Cover the bowl and let it sit for 20 minutes.
Add white wheat flour, salt, and butter to the bowl. Attach the dough hook to your stand mixer and knead the dough until it becomes smooth and elastic. Lightly sprinkle your work surface with flour and briefly knead the dough by hand. Shape the dough into a ball. Drizzle olive oil over the dough and place it back into the bowl. Cover the bowl with plastic wrap and let it sit for 30 minutes.
Preheat the oven to 350°F (175°C). Take the dough out of the bowl and briefly knead it to release any large air bubbles. Shape the dough into a log that is approximately 13 inches long to fit inside the pan. Place the log into the pan with the seam-side facing down. Put the lid on the pan and set it aside until the dough rises to about an inch below the top of the pan. This should take around 40 minutes, but you can check after 30 minutes.
Bake the loaf in the preheated oven until it turns golden brown, which should take about 40 minutes. Remove the loaf from the pan and let it cool completely on a rack before slicing.
Have you ever wondered how bakeries achieve that tantalizing square shape of a Pullman loaf? The kind of bread that's perfect for sandwiches and toast, with a soft and delicate crumb? Well, wonder no more! In this article, we will unravel the secrets to baking the perfect Pullman loaf, step by step. So, let's get started!
Before we dive into the nitty-gritty of baking a Pullman loaf, let's talk about why it's worth the effort. A Pullman loaf offers many advantages over other types of bread. Its square shape allows for uniform slices, making it ideal for sandwiches. The lid that comes with the Pullman pan ensures a perfectly even top crust, resulting in a visually appealing loaf. And let's not forget about the texture! The Pullman loaf has a tender and soft crumb that is simply irresistible.
The secret to achieving the iconic square shape of a Pullman loaf lies in the pan itself. The Pullman pan is a specially designed bread pan with a lid that slides onto the top. This lid ensures that the loaf bakes evenly and rises perfectly to fill the pan's dimensions. It also prevents the formation of a domed top, giving you that coveted square shape.
Now that we have our Pullman pan ready, it's time to talk about the recipe. While there are countless variations out there, the key to a great Pullman loaf lies in a few essential ingredients. Flour, water, yeast, salt, and a touch of sugar are the basics. However, to add flavor and complexity, you can experiment with different types of flour, such as whole wheat or rye, and even incorporate herbs, seeds, or cheese.
Once you have your dough mixed, it's time to knead it. Kneading is a crucial step in bread-making as it develops gluten in the dough, giving the bread its structure and elasticity. Think of kneading as a workout for your dough. You want to work it enough to strengthen the gluten but not too much to overwork it. It's like finding the perfect balance between strength and flexibility.
After kneading, it's time to let your dough rise. This step allows the yeast to do its magic, fermenting the dough and creating carbon dioxide bubbles that give the bread its light and airy texture. The first rise, also known as the bulk rise, is usually done in a covered bowl until the dough has doubled in size. Once it has risen, you can shape it into a rectangle and place it in the Pullman pan for its final rise.
Preheat your oven, slide the lid onto your Pullman pan, and place it in the oven. The lid helps trap steam inside the pan, creating the perfect environment for baking a Pullman loaf. This steam keeps the bread moist, allowing it to rise fully and develop that soft and tender crumb. Bake the loaf until it's golden brown, and the aroma fills your kitchen, signaling that it's ready to be enjoyed.
Now that you've mastered the art of baking a Pullman loaf, the possibilities are endless. Slice it up for sandwiches, toast it for breakfast, or use it as the foundation for a delicious bread pudding. The Pullman loaf is not just bread; it's a vessel for your culinary creativity.
Baking a Pullman loaf is a rewarding experience that will elevate your bread-making skills to new heights. With the right pan, a well-crafted recipe, and a touch of patience, you can achieve bakery-worthy results in your own kitchen. So, gather your ingredients, preheat your oven, and get ready to enjoy the delicious journey of baking the perfect Pullman loaf.
No, a regular loaf pan will not give you the same square shape and even baking as a Pullman pan. The lid is essential for achieving the desired results.
Absolutely! Whole wheat flour will add a nutty flavor and a denser texture to your Pullman loaf. Just keep in mind that it may require a bit more water and a longer rise time.
Yes, you can freeze a Pullman loaf. Wrap it tightly in plastic wrap or place it in a freezer bag to maintain freshness. Thaw it at room temperature when ready to enjoy.
The bulk rise usually takes around 1 to 2 hours, depending on the temperature of your kitchen. The final rise in the Pullman pan takes about 30 to 45 minutes.
Absolutely! Adding herbs or cheese to your Pullman loaf can elevate its flavor profile. Just make sure to adjust the quantities accordingly and evenly distribute them throughout the dough.
Yes, you can substitute instant yeast for active dry yeast. However, instant yeast does not require proofing, so you can add it directly to the dry ingredients.
Your Pullman loaf is ready when it's golden brown on top and sounds hollow when tapped on the bottom. You can also use an instant-read thermometer to check that the internal temperature reaches around 190°F (88°C).
Yes, you can use a bread machine to mix and knead the dough for your Pullman loaf. However, you will still need to shape it into a rectangle and transfer it to the Pullman pan for its final rise and baking.
AprilCook, recipe developer and the heart of Chefwiz. More about April