Puff Pastry Braid
Rate this recipeBe the first to rate
 By AprilPublished
 When it comes to indulgence, few things can compare to the buttery, flaky goodness of a puff pastry.
 By AprilPublished
 When it comes to indulgence, few things can compare to the buttery, flaky goodness of a puff pastry.
Preheat the oven to 375 degrees F.
Line a sheet pan with parchment.
On a lightly floured surface, lay out the puff pastry.
Divide the pastry into 3 equal sections.
Spread the hazelnut spread on the center section, leaving a 1/2-inch border at the top and bottom.
Sprinkle the peanuts over the chocolate hazelnut spread.
Using a sharp knife, cut the 2 outside sections into six 1-inch horizontal strips, stopping at the center section.
Fold the 1/2-inch borders at the top and bottom inwards, covering the edges of the chocolate filling.
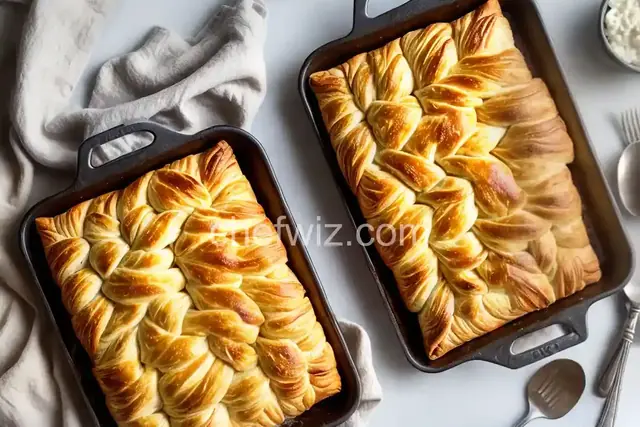
Starting at one end, fold the pastry strips over the filling in an alternating pattern to create a braid appearance.
Place the pastry braid on the parchment-lined sheet pan.
Brush the pastry braid with the beaten egg and sprinkle with sea salt.
Bake in the preheated oven until golden and cooked through, for about 28 to 30 minutes.
While the pastry bakes, make the icing by whisking the powdered sugar, vanilla, and milk in a bowl until smooth. Set aside.
Allow the pastry to cool for 10 to 15 minutes.
Drizzle the icing over the pastry.
Slice and serve.
When it comes to indulgence, few things can compare to the buttery, flaky goodness of a puff pastry. And if you're looking to take your puff pastry game to the next level, then a puff pastry braid is just what you need. This delightful twist not only looks impressive, but it also adds a burst of flavor to your ordinary pastry. So, let's dive into the world of puff pastry braids and discover how you can create your own mouthwatering masterpiece.
Before we delve into the art of braiding, let's take a moment to appreciate the wonder that is puff pastry. Imagine a pastry that rises beautifully, creating countless layers of flaky goodness. It's like a symphony in your mouth, with each bite revealing a harmonious blend of textures and flavors. Whether you're making sweet or savory treats, puff pastry is your secret weapon to impress your friends and family.
Now that you understand the magic of puff pastry, it's time to learn the art of braiding. Think of it as a culinary ballet, where your hands gracefully weave the pastry strips into a beautiful pattern. The result? A visually stunning treat that's bound to make everyone's mouth water.
Start by rolling out your puff pastry into a rectangular shape. Cut it into long, thin strips, leaving a small portion intact at one end. This will serve as the base for your braid. Now, you're ready to embark on your braiding adventure.
Take two strips of puff pastry and twist them together, working your way down. As you go, keep adding more strips, alternating between the left and right sides. The key is to create a tight braid that holds its shape while baking. Once you reach the end, secure the braid by tucking the loose ends underneath.
Before you pop your masterpiece into the oven, brush it with an egg wash to give it a beautiful golden color. You can also sprinkle some sesame seeds or cinnamon sugar on top for an extra touch of flavor. Now, it's time to let the heat work its magic.
While a puff pastry braid is delightful on its own, you can take it to new heights by exploring different flavor combinations. For a savory twist, try filling your braid with cheese, spinach, and sun-dried tomatoes. Or, if you have a sweet tooth, go for a filling of Nutella and sliced bananas. The possibilities are endless, and your taste buds will thank you for the adventure.
There you have it – the art of creating a puff pastry braid. From the mesmerizing layers of flaky pastry to the creative braiding technique, this culinary delight is sure to impress both your eyes and taste buds. So, gather your ingredients, unleash your creativity, and let the magic of puff pastry unfold in your kitchen. Your friends and family will be in awe of your impressive baking skills!
A1: Absolutely! Store-bought puff pastry works just as well and saves you time in the kitchen. Just make sure to follow the instructions on the package for best results.
A2: The baking time may vary depending on the size and thickness of your braid. A general guideline is to bake it at 375°F (190°C) for about 25-30 minutes or until it turns golden brown.
A3: Yes, you can freeze your puff pastry braid before baking. Simply wrap it tightly in plastic wrap and store it in the freezer for up to a month. When you're ready to bake, let it thaw in the refrigerator overnight and then follow the baking instructions as usual.
A4: Absolutely! There are plenty of vegan puff pastry options available in stores or you can make your own using plant-based butter. As for the filling, get creative with vegetables, vegan cheese, or even fruit fillings.
A5: Of course! Mini puff pastry braids are perfect for individual servings or as appetizers. Simply adjust the size of your pastry strips and follow the same braiding technique.
A6: Yes, you can reheat your puff pastry braid by placing it in a preheated oven at 350°F (175°C) for about 5-10 minutes or until warm. Just be careful not to overheat, as it may lose its flakiness.
A7: Absolutely! Feel free to experiment with different fillings and create a delightful combination of sweet and savory flavors. For example, you can fill one half with ham and cheese and the other half with apples and cinnamon.
A8: Yes, you can skip the egg wash if you prefer. However, the egg wash adds a beautiful golden color and a glossy finish to your braid. You can also substitute it with milk or a vegan alternative for a similar effect.
AprilCook, recipe developer and the heart of Chefwiz. More about April