Peppermint Layer Cake with Candy Cane Frosting
Rate this recipeBe the first to rate
 By AprilPublished
 Who doesn't love the refreshing taste of peppermint? And when it's combined with a moist and fluffy cake, it's a match made in dessert heaven.
 By AprilPublished
 Who doesn't love the refreshing taste of peppermint? And when it's combined with a moist and fluffy cake, it's a match made in dessert heaven.
Preheat the oven to 350 degrees F and position racks in the middle and lower thirds.
Lightly butter three 8-inch-round cake pans and line the bottoms with parchment paper. Butter the parchment and dust with flour, tapping out the excess.
In a medium bowl, sift together the flour, baking powder, and salt.
In a small bowl, combine the milk and vanilla and peppermint extracts. Set aside.
In a large bowl, beat the butter with a mixer on medium speed until smooth for about 1 minute.
Gradually beat in 1 cup of sugar, then increase the mixer speed to high and continue beating until light and fluffy, about 5 minutes.
Reduce the mixer speed to low and add the flour mixture in 3 additions, alternating with the milk mixture. Start and end with the flour mixture, mixing until just combined.
Scrape down the side of the bowl, then increase the mixer speed to medium and beat until smooth for about 5 more minutes.
In a separate large bowl, beat the egg whites with a mixer on high speed until foamy.
Gradually add the remaining 1/2 cup of sugar and continue beating until stiff, shiny peaks form, about 6 minutes.
Gently fold the egg white mixture into the batter in 3 additions until combined using a rubber spatula.
Divide the batter evenly among the prepared pans.
Who doesn't love the refreshing taste of peppermint? And when it's combined with a moist and fluffy cake, it's a match made in dessert heaven. In this article, we'll explore the delightful world of peppermint layer cake with candy cane frosting. Get ready to indulge your senses and satisfy your sweet tooth!
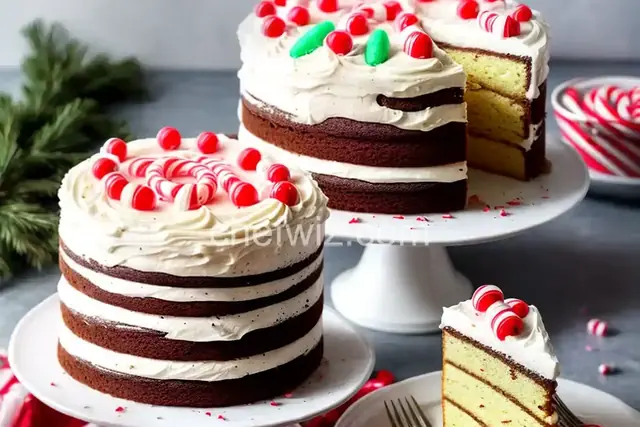
Peppermint layer cake with candy cane frosting is not only a delicious treat, but it's also a feast for the eyes. Picture this: layers of velvety cake, each infused with the cool and invigorating flavor of peppermint. The frosting, a creamy blend of candy cane goodness, adds a touch of sweetness and a hint of holiday cheer. With its vibrant red and white color scheme, this cake is a showstopper at any festive gathering.
When it comes to a successful layer cake, balance is key. The peppermint flavor should be prominent, but not overpowering. The cake layers should be light and airy, with just the right amount of moisture. And the candy cane frosting should be smooth and creamy, with a subtle hint of mint. Achieving this balance is an art form, and the result is a cake that is both indulgent and refreshing.
Imagine taking a bite of this peppermint masterpiece. The flavors dance on your tongue, intertwining in a symphony of deliciousness. The coolness of the peppermint, the sweetness of the cake, and the subtle crunch of the candy cane pieces all come together in perfect harmony. Each bite is a delightful surprise, a burst of flavor that leaves you craving for more.
Peppermint layer cake with candy cane frosting is a delightful and festive treat that is sure to impress. Its cool and refreshing flavors, combined with its visually stunning appearance, make it the perfect dessert for any holiday celebration. Whether you're hosting a party or simply want to indulge in a slice of heaven, this cake is a guaranteed crowd-pleaser. So go ahead, embrace the magic of peppermint, and treat yourself to a slice of pure bliss!
Peppermint extract is what gives this cake its distinctive flavor. However, if you prefer a milder mint taste, you can reduce the amount of extract or substitute it with a different flavoring, such as vanilla or almond.
While candy cane frosting adds a festive touch to the cake, you can certainly use a different frosting if you prefer. Cream cheese frosting or vanilla buttercream would both be delicious choices.
Yes, you can make the cake layers ahead of time and freeze them. Simply wrap each layer tightly in plastic wrap and place them in an airtight container or freezer bag. Thaw the layers before assembling and frosting the cake.
Absolutely! You can get creative with your cake decorations. Crushed candy canes, chocolate shavings, or even fresh mint leaves would all make beautiful and tasty additions to the cake.
Yes, you can use a different type of cake pan if you don't have a specific size or shape. Just keep in mind that the baking time may vary, so it's important to adjust accordingly and keep an eye on the cake as it bakes.
Absolutely! There are many gluten-free cake recipes available that you can use as a base for this peppermint layer cake. Simply substitute the regular flour with a gluten-free flour blend, and follow the rest of the recipe as usual.
Of course! If you're short on time or prefer the convenience, you can use store-bought frosting for this cake. Just make sure to choose a flavor that complements the peppermint layers, such as vanilla or cream cheese.
Absolutely! Adding a few drops of red food coloring to the cake batter can give the layers a vibrant, festive look. Just be sure to mix the food coloring well to achieve an even color throughout the cake.
AprilCook, recipe developer and the heart of Chefwiz. More about April