Oven-Baked BBQ Ribs
Rate this recipeBe the first to rate
 By AprilPublished
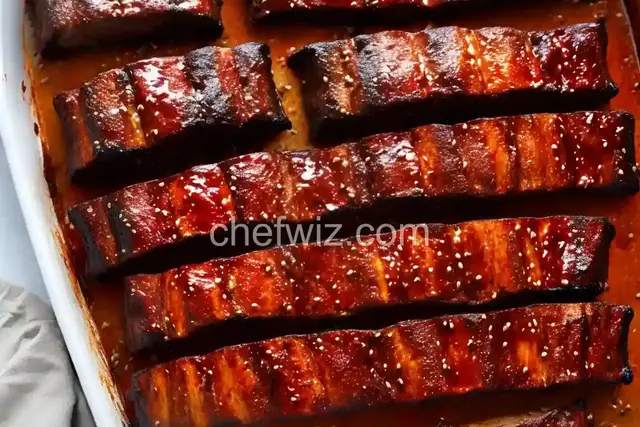
 Who doesn't love sinking their teeth into succulent, fall-off-the-bone ribs slathered in smoky barbecue sauce?
 By AprilPublished
 Who doesn't love sinking their teeth into succulent, fall-off-the-bone ribs slathered in smoky barbecue sauce?
Preheat the oven to 350 degrees F (175 degrees C).
Split the ribs down the center between the bones.
In a bowl, combine onions, ketchup, water, vinegar, brown sugar, Worcestershire sauce, mustard powder, and salt. Set aside half of the sauce for later.
Heat oil in a large skillet over medium-high heat. Brown the ribs in batches for about 4 to 5 minutes per batch.
Transfer the ribs to two baking pans, arranging them in a single layer. Pour the remaining BBQ sauce over the ribs.
Bake in the preheated oven for 3 hours.
Every 20 minutes, turn and baste the ribs with the reserved sauce, using all the sauce after 2 hours of cooking.
For the last hour, continue to turn the ribs every 20 minutes, basting them with the sauce in the pan. The meat should easily pull away from the bone, and an instant-read thermometer inserted into the center should read at least 145 degrees F (63 degrees C).
Please note that the nutrition data provided includes the full amount of BBQ sauce, but the actual amount consumed may vary.
Who doesn't love sinking their teeth into succulent, fall-off-the-bone ribs slathered in smoky barbecue sauce? The thought alone is enough to make your mouth water. But what if you don't have a grill or a smoker? Fear not! You can still enjoy the deliciousness of BBQ ribs right from the comfort of your own home with this oven-baked method.
Before we dive into the nitty-gritty of the recipe, let's talk about the secret to tender ribs. It's all about the low and slow cooking method. By cooking the ribs at a low temperature for a long period of time, the collagen in the meat breaks down, resulting in tender, melt-in-your-mouth ribs.
Think of it like a marathon - you wouldn't sprint the entire race, right? You pace yourself, taking slow and steady steps to reach the finish line. The same principle applies to cooking ribs. Low and slow is the way to go.
When it comes to ribs, you have a few options to choose from. The most popular choices are baby back ribs and spare ribs. Baby back ribs are smaller and leaner, while spare ribs are larger and meatier. Both are delicious, so it really comes down to personal preference.
It's important to note that before you start cooking, you'll want to remove the membrane from the back of the ribs. This thin layer can prevent the flavors from penetrating the meat and can make the ribs chewy. Simply slide a knife under the membrane, lift it up, and peel it off.
No BBQ ribs are complete without a flavorful rub. A rub is a mixture of herbs and spices that adds a depth of flavor to the meat. You can use a store-bought rub or make your own by combining your favorite spices like paprika, garlic powder, onion powder, brown sugar, salt, and pepper.
Think of the rub as the icing on the cake - it adds that extra layer of deliciousness to the ribs. Rub it generously all over the meat, making sure to coat it evenly.
Now that we have our ribs seasoned and ready to go, it's time to dive into the cooking process. Preheat your oven to a low temperature, around 275°F (135°C). Place the ribs on a baking sheet lined with aluminum foil, bone-side down. Cover the ribs with another sheet of foil, creating a sealed packet.
Think of this packet as a little sauna for your ribs. The trapped heat and moisture will help tenderize the meat and keep it from drying out. Pop the ribs into the oven and let them cook for about 2-3 hours. The exact cooking time will depend on the size of your ribs and how tender you like them.
While the ribs are cooking, you can prepare your BBQ sauce. Whether you like it sweet and tangy or spicy and smoky, there are endless variations to choose from. Once the ribs are done cooking, remove them from the oven and carefully unwrap them from the foil packet.
Now it's time to glaze those ribs with your homemade BBQ sauce. Brush it on generously, making sure to cover every nook and cranny. The final step is to pop the ribs back into the oven for another 15-20 minutes, or until the sauce is sticky and caramelized.
Once the ribs are glazed and caramelized, it's time to dig in! Cut them into individual ribs and serve them up with your favorite sides, whether it's cornbread, coleslaw, or mac and cheese. The tender meat, paired with the smoky and tangy flavors of the BBQ sauce, will have your taste buds dancing with delight.
So the next time you're craving BBQ ribs but don't have access to a grill or smoker, remember that you can still achieve mouthwatering results with your oven. Follow these steps, take your time, and let the low and slow cooking method work its magic.
While this recipe is specifically for BBQ ribs, you can apply the low and slow cooking method to other cuts of meat as well. Pork shoulder, beef brisket, and even chicken can benefit from this cooking technique.
Absolutely! Store-bought BBQ sauce works just as well as homemade sauce. Choose your favorite brand or experiment with different flavors to find the one that tickles your taste buds.
The foil packet helps trap the heat and moisture, resulting in tender ribs. If you prefer a chewier texture, you can skip the foil packet and cook the ribs directly on the baking sheet. Just keep in mind that they may dry out a bit.
If you want that smoky flavor and charred finish, you can certainly finish the ribs on the grill. Once you've glazed them with BBQ sauce, place them on a preheated grill over medium-high heat. Grill for a few minutes on each side until the sauce is caramelized.
If you have any leftovers (which is rare!), you can store them in an airtight container in the refrigerator for up to 3-4 days. Simply reheat them in the oven or microwave before enjoying.
Yes, you can freeze the cooked ribs for later enjoyment. Wrap them tightly in foil or place them in a freezer-safe container. They will keep well for up to 3 months. Thaw them in the refrigerator before reheating.
Absolutely! The rub is where you can get creative and experiment with different flavors. Try adding cayenne pepper for a spicy kick or smoked paprika for a smoky flavor.
While it may be tempting to crank up the oven temperature to speed up the cooking process, it's best to stick with a low temperature. The slow cooking method is what ensures tender and juicy ribs. Patience is key!
In conclusion, oven-baked BBQ ribs are a delicious alternative for those without a grill or smoker. By applying the low and slow cooking method, you can achieve tender, melt-in-your-mouth ribs right from the comfort of your own kitchen. So grab
AprilCook, recipe developer and the heart of Chefwiz. More about April