Kumquat Tart Recipe
Rate this recipeBe the first to rate
 By AprilPublished
 Are you craving a burst of citrusy goodness in a delectable dessert?
 By AprilPublished
 Are you craving a burst of citrusy goodness in a delectable dessert?
In the bowl of a stand mixer fitted with a paddle attachment, combine butter and confectioner's sugar.
Split and scrape the vanilla bean, adding the scrapings to the bowl.
Set the mixer to medium-low speed and mix until the butter is light and fluffy (around 2 minutes), scraping the bowl as necessary.
With the mixer running, add the egg yolks one at a time, scraping the bowl in between each addition.
Add the cake flour and salt, and mix on low until fully incorporated (about 15 seconds).
Transfer the mixture to a lightly floured board and shape it into a 4-inch circle.
Wrap the dough in plastic wrap and chill it in the refrigerator for at least 30 minutes.
Position a rack in the middle of the oven and preheat it to 350°F.
On a lightly floured surface, roll out the dough to a thickness of 1/8 inch, turning it frequently to maintain a circular shape.
Place an 8-inch springform pan in the center of the dough and cut a circle around it that is one inch larger than the pan.
Remove the pan and center the dough in it, pressing it into the bottom. Don't worry if the dough tears or folds over itself, as it can be patched.
Ensure that the edge of the dough forms a right angle all the way around and press the excess
Are you craving a burst of citrusy goodness in a delectable dessert? Look no further than a luscious Kumquat Tart! This delightful treat combines the tanginess of kumquats with a buttery pastry crust, resulting in a tantalizing symphony of flavors that will leave you craving for more.
Kumquats, often referred to as "little oranges," are small citrus fruits with a unique characteristic - you can eat them whole, skin and all! These tiny powerhouses are bursting with flavor and provide a perfect balance of sweetness and tartness. The natural oils in their peel create an aromatic experience, enhancing the overall taste of the tart.
When combined with a perfectly baked pastry crust, the contrasting textures create a culinary masterpiece that is sure to impress your taste buds. The buttery crust acts as a canvas, allowing the vibrant flavors of the kumquats to shine through.
Before you embark on your kumquat tart journey, it's essential to master the art of making a flaky pastry crust. Imagine sinking your teeth into a slice of tart with a crust so delicate, it melts in your mouth.
Creating the perfect pastry crust requires a balance of precision and creativity. The cold butter needs to be cut into the flour until it resembles coarse crumbs. This process ensures that the butter is distributed evenly, resulting in a tender and flaky crust. Don't forget to chill the dough before rolling it out – this step guarantees a crust that holds its shape and bakes to perfection.
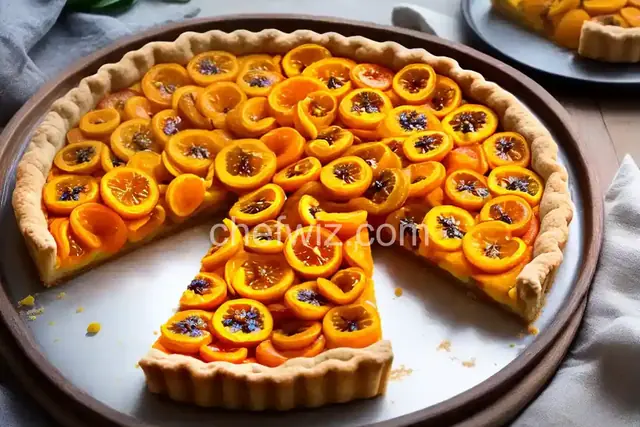
Once you have your buttery crust ready, it's time to bring the kumquats into the mix. Slicing the kumquats into thin rounds allows them to soften and release their citrusy essence while baking. The natural sweetness of the fruit shines through, complemented by the tartness that tantalizes your taste buds.
As the tart bakes in the oven, the flavors meld together, creating a symphony of taste and aroma that fills your kitchen. The crust turns golden brown, the kumquats become tender and jam-like, resulting in a visually stunning dessert that is as delightful to look at as it is to eat.
Indulging in a slice of Kumquat Tart is a sensory experience like no other. The tangy burst from the kumquats, the flaky crust, and the aromatic essence create a harmony that dances on your taste buds. Whether you're a seasoned baker or a novice in the kitchen, this recipe is sure to impress.
While kumquats are the star of this tart, you can experiment with other citrus fruits like oranges or lemons. However, keep in mind that the flavor profile may differ.
Absolutely! You can prepare the pastry crust ahead of time and refrigerate it until you're ready to assemble the tart. This way, you save time on the day of baking.
If you're short on time or prefer convenience, you can use a store-bought pastry crust. However, making it from scratch adds a personal touch and elevates the overall taste.
The baking time may vary depending on your oven, but on average, it takes around 30-35 minutes for the tart to achieve the perfect golden-brown crust and soft, jam-like kumquats.
Absolutely! Adding a dollop of whipped cream or a scoop of vanilla ice cream complements the tart's tanginess and adds a creamy element to the dessert.
Yes, you can freeze the tart for up to a month. Just make sure to wrap it tightly in plastic wrap and place it in an airtight container before freezing. Thaw it in the refrigerator overnight before serving.
If you prefer a sweeter tart, you can sprinkle a little sugar on top of the kumquats before baking. This will enhance the sweetness while still retaining the tartness.
Absolutely! You can experiment with adding a hint of cinnamon, a touch of ginger, or even a splash of liqueur to the tart filling. Just remember to balance the flavors to complement the kumquats.
AprilCook, recipe developer and the heart of Chefwiz. More about April