Halloween Cake Pops
Rate this recipeBe the first to rate
 By AprilPublished
 Halloween is just around the corner, and what better way to celebrate this spooky season than with some delicious Halloween-themed treats?
 By AprilPublished
 Halloween is just around the corner, and what better way to celebrate this spooky season than with some delicious Halloween-themed treats?
Prepare and bake the cake as directed on the package for a 9-by-13-inch pan. Allow it to cool completely.
Break the cake into pieces and transfer them to a food processor. Add the frosting and process until the mixture forms a ball and pulls away from the sides of the bowl, approximately 30 seconds. If the mixture doesn't come together, gradually add more frosting, 1 tablespoon at a time, until it holds its shape.
Using a 3/4-ounce scoop, shape the mixture into approximately 46 balls and place them on a baking sheet lined with parchment paper. Refrigerate until firm, about 30 minutes.
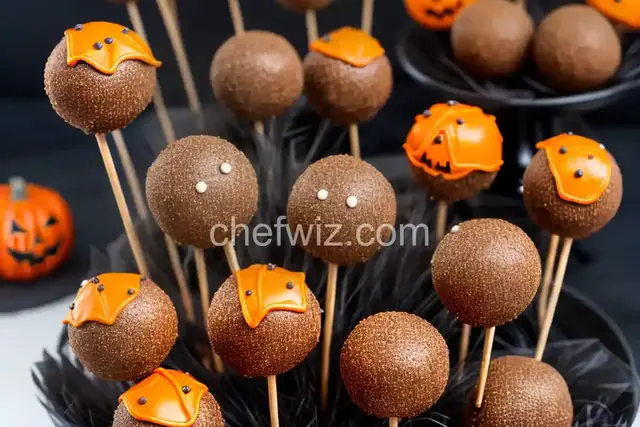
Meanwhile, place the orange candy melting wafers in a microwave-safe bowl and microwave them according to the instructions on the package until melted. Dip the tips of 46 lollipop sticks about 1/2 inch into the melted candy, then insert each stick halfway into a cake ball. Refrigerate the cake pops until completely chilled, about 1 hour.
Microwave the orange candy again until melted, then pour it into a tall, narrow glass. Dip 23 of the cake pops into the melted candy, allowing any excess to run off. For spider cake pops, place a jumbo black nonpareil on top and slightly above the center of as many orange-dipped pops as desired while the coating is still wet. Insert the cake pops, both plain and nonpareil-topped,
Halloween is just around the corner, and what better way to celebrate this spooky season than with some delicious Halloween-themed treats? If you're looking for a fun and creative dessert idea, look no further than Halloween cake pops. These bite-sized delights are not only visually appealing but also incredibly tasty. Whether you're hosting a Halloween party or just want to surprise your little ones, Halloween cake pops are sure to be a hit. So, let's dive into the world of these delectable treats and discover why they should be the star of your Halloween spread.
Cake pops have gained immense popularity in recent years, and for a good reason. These small, round treats offer a perfect combination of flavors and textures. Imagine sinking your teeth into a moist and flavorful cake, coated with a decadent layer of chocolate or candy melts. Each bite provides a burst of sweetness and a satisfying crunch. The best part? They come in a variety of designs and decorations, making them ideal for any occasion, including Halloween.
When it comes to Halloween cake pops, the possibilities are endless. From cute and spooky ghosts to creepy witches and pumpkins, you can let your creativity run wild. Creating these delightful treats is like crafting miniature works of art. With a few simple ingredients and some basic decorating skills, you can transform plain cake pops into eye-catching Halloween-themed delights. Get the kids involved and turn it into a fun family activity. It's a great way to spend quality time together while indulging in some delicious treats.
One of the best things about Halloween cake pops is that they appeal to both young and old. The kids will love the colorful and whimsical designs, while adults will appreciate the nostalgia of enjoying a childhood favorite in a new and exciting way. These portable treats are perfect for parties, trick-or-treating, or even as a sweet surprise in lunch boxes. Plus, they make for great conversation starters and Instagram-worthy posts. Who can resist snapping a photo of a spooky cake pop before taking a bite?
Halloween cake pops are a delightful and versatile treat that can add a touch of whimsy to any Halloween celebration. With their adorable designs and mouthwatering flavors, they are sure to be a hit with both kids and adults alike. So, get your apron on, gather your ingredients, and let your creativity shine as you embark on the journey of making spooktacular Halloween cake pops. Whether you're hosting a party or simply want to indulge in some festive treats, these bite-sized delights will surely leave everyone with a smile on their faces and a satisfied sweet tooth.
Absolutely! Halloween cake pops can be made a day or two in advance. Just store them in an airtight container in the refrigerator until you're ready to serve. This makes them a convenient option for busy Halloween preparations.
Not at all! While they may look intricate, making Halloween cake pops is surprisingly simple. With a little practice and patience, you'll be able to create stunning designs. There are plenty of online tutorials and step-by-step guides to help you along the way.
Absolutely! Using store-bought cake mix can save you time and effort. Just follow the instructions on the box, bake the cake, and crumble it. You can then proceed with shaping the cake pops and adding the decorations.
Definitely! While traditional cake pops are made with vanilla or chocolate cake, you can experiment with different flavors. From pumpkin spice to red velvet, feel free to get creative and tailor the flavors to suit your taste preferences.
Candy melts or melting chocolate wafers work best for coating cake pops. They come in a variety of colors and flavors, making it easy to match them with your Halloween theme. Avoid using regular chocolate bars, as they may not harden properly.
When stored properly in an airtight container, Halloween cake pops can stay fresh for up to a week. However, they are usually so delicious that they tend to disappear within a day or two!
Absolutely! Halloween cake pops are a perfect addition to any Halloween-themed party. They not only add to the spooky ambiance but also provide a delightful sweet treat for your guests.
Yes, you can get as creative as you want with the decorations. From sprinkles and edible glitter to fondant and royal icing, the options are endless. Let your imagination run wild and create unique and eye-catching designs.
AprilCook, recipe developer and the heart of Chefwiz. More about April