DIY Sesame Sticks Recipe
Rate this recipeBe the first to rate
 By AprilPublished
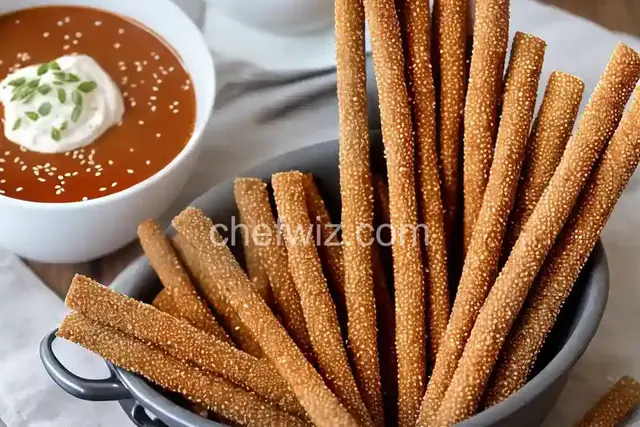
 Are you a fan of crispy, savory snacks? Look no further than DIY sesame sticks!
 By AprilPublished
 Are you a fan of crispy, savory snacks? Look no further than DIY sesame sticks!
In a medium-sized bowl, combine flour, sesame seeds, cracked wheat, turmeric, beet powder (if desired), garlic powder, and salt. Mix well.
In a small bowl, whisk together oil and water. Pour the wet ingredients into the dry ingredients and stir until thoroughly combined. Use your hands to knead any remaining bits into the dough.
Divide the dough in half and wrap each portion in plastic, flattening them into 3/4-inch-thick disks. Place in the refrigerator for 30 minutes to allow the dough to firm up.
In a large pot or deep-sided skillet, heat canola oil over medium heat to 350°F (177°C). Line a baking sheet with paper towels and set aside.
On a lightly floured surface, roll out the dough to a thickness of 1/8 inch. Use a knife or pizza wheel to cut the dough into small rectangles, approximately 1/4 inch by 3/4 inch. Alternatively, you can roll and cut the dough into your desired shape. If there are any scraps, rework them until all the dough is used.
Working in three batches, carefully add the shaped dough to the hot oil and fry. Stir occasionally until the pieces are deeply golden brown, which should take about 90 seconds. Use a slotted spoon or spider to transfer the fried sesame sticks to the prepared baking sheet. Repeat this process with the remaining dough, making
Are you a fan of crispy, savory snacks? Look no further than DIY sesame sticks! These crunchy delights are perfect for snacking on the go or serving as an appetizer at your next gathering. In this article, we will explore the world of sesame sticks, their origins, and how you can make them at home. Let's dive in!
Before we delve into the recipe, let's take a moment to appreciate the origins of sesame sticks. These delightful treats have a rich history that dates back centuries. Originating in the Middle East, sesame sticks were a popular snack among travelers due to their long shelf life and ability to withstand harsh conditions.
Over time, sesame sticks made their way across different cultures, each adding their own unique twist. In the United States, for example, sesame sticks are often coated in a savory seasoning blend, giving them a burst of flavor that is hard to resist.
While you can easily find sesame sticks at your local grocery store, there's something special about making them from scratch. Not only do you have control over the ingredients, but the process itself can be a fun and rewarding experience.
Imagine the satisfaction of pulling a batch of freshly baked sesame sticks out of the oven, knowing that you made them with your own two hands. Plus, by making your own, you can experiment with different flavors and seasonings to create a snack that perfectly suits your taste buds.
Before we jump into the recipe, let's gather the essential ingredients and equipment. You'll need:
Once you have everything ready, it's time to start making your own sesame sticks!
1. In a large bowl, mix together the flour, sesame seeds, and seasonings. This will be the base for your sesame sticks, so feel free to get creative with the flavors. You can experiment with garlic powder, paprika, or even a hint of chili for a spicy kick.
2. Slowly add olive oil to the dry mixture, stirring until the dough comes together. You want the dough to be slightly sticky but not overly wet. If it feels too dry, add a splash of water. If it's too wet, sprinkle in more flour.
3. On a floured surface, roll out the dough into a thin sheet. Aim for a thickness of about 1/8 inch. The thinner the dough, the crispier your sesame sticks will be.
4. Using a knife or a pizza cutter, cut the dough into long, thin strips. Think of them as mini breadsticks. Don't worry about making them perfectly uniform – a little variation adds to their charm.
5. Carefully transfer the strips onto a baking sheet lined with parchment paper. Make sure to leave some space between each strip to allow for even baking.
6. Preheat your oven to 350°F (175°C) and bake the sesame sticks for about 15-20 minutes, or until they turn golden brown. Keep a close eye on them, as they can quickly go from golden to burnt.
7. Once baked, remove the sesame sticks from the oven and let them cool completely. As they cool, they will become even crispier, so be patient!
8. Once cooled, store your homemade sesame sticks in an airtight container to maintain their freshness. They should stay crispy for up to a week, but we doubt they'll last that long!
1. Can I use whole wheat flour instead of all-purpose flour?
Yes, whole wheat flour can be a great alternative. It will add a nutty flavor and a slightly denser texture to your sesame sticks.
2. Can I use black sesame seeds instead of white?
Absolutely! Black sesame seeds will give your sesame sticks a striking appearance and a slightly earthier taste.
3. Can I make sweet sesame sticks?
Of course! Simply replace the savory seasonings with a sprinkle of cinnamon and a touch of honey. You'll have a delightful sweet treat in no time.
4. How long do sesame sticks last?
When stored in an airtight container, homemade sesame sticks can stay fresh and crispy for up to a week.
5. Are sesame sticks gluten-free?
Unfortunately, traditional sesame sticks are not gluten-free due to the use of flour. However, you can experiment with gluten-free flours to create a suitable alternative.
6. Can I freeze sesame sticks?
While it's possible to freeze sesame sticks, we recommend enjoying them fresh for the best texture and flavor.
7. Can I add other toppings to my sesame sticks?
Absolutely! Feel free to get creative with your toppings. Some popular options include grated Parmesan cheese, dried herbs, or even a sprinkle of sea salt.
8. Can I double the recipe?
Yes, you can easily double or even triple the recipe to make a larger batch of sesame sticks. Just make sure you have enough baking sheets and oven space to accommodate the extra dough.
Now that you know the secrets to making your own crispy, flavorful sesame sticks, it's time to roll up your sleeves and get baking! Whether you choose to stick to the classic savory version or experiment with different flavors, these homemade treats are sure to impress. So go ahead, give it a try, and enjoy the satisfaction of creating a delicious snack from scratch!
AprilCook, recipe developer and the heart of Chefwiz. More about April