Creepy Halloween Skull Cupcakes
Rate this recipeBe the first to rate
 By AprilPublished
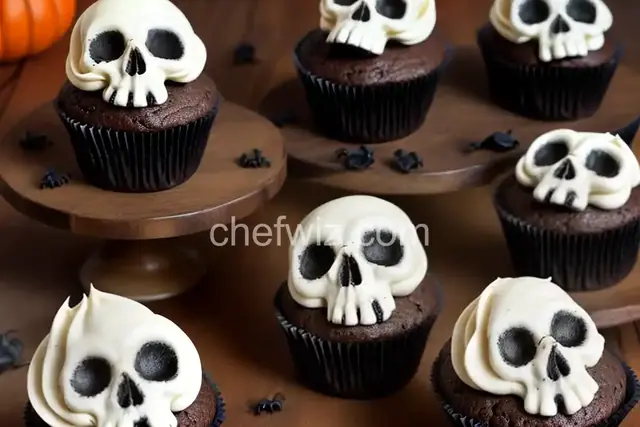
 Are you ready to make your Halloween party a bone-chilling success?
 By AprilPublished
 Are you ready to make your Halloween party a bone-chilling success?
Preheat the oven to 350 degrees F (175 degrees C).
Place paper liners in two 12-cup muffin tins, preferably dark-colored or Halloween-themed ones.
In a large bowl, combine cake mix, water, eggs, and oil.
Use an electric mixer on low speed to mix until moistened, approximately 30 seconds.
Increase the mixer speed to medium and continue to beat until the batter is smooth and creamy, approximately 2 minutes.
Spoon the batter into the prepared muffin cups, filling each one about 3/4 full.
Bake in the preheated oven for 18 to 20 minutes or until a toothpick inserted into the center comes out clean.
Remove the muffin tins from the oven and allow them to cool on a wire rack for 15 minutes.
Take the cupcakes out of the tins and let them cool completely on a wire rack for about 1 hour before decorating.
Spread a thin layer of white vanilla frosting onto each cupcake and refrigerate for 30 minutes to make decorating easier.
Remove the cupcakes from the fridge and apply a second layer of white frosting.
Fill a piping bag with chocolate frosting and attach a small round tip.
Use the piping bag to draw a skull face on each cupcake: create large ovals for the eyes, two dots for the nostrils, and a large
Are you ready to make your Halloween party a bone-chilling success? Look no further than these creepy Halloween skull cupcakes! These spooky treats are not only delicious but also a great way to add a touch of fright to your celebrations. Whether you're hosting a Halloween party or just want to surprise your family with a ghoulish treat, these skull cupcakes are sure to be a hit.
Before we dive into the eerie world of skull cupcakes, let's make sure we have all the ingredients we'll need. Don't worry; you won't need any witchcraft to find these supplies. Just a quick trip to your local grocery store should do the trick.
To create these spine-tingling cupcakes, you'll need the basics: flour, sugar, eggs, butter, and baking powder. These ingredients form the foundation of your cupcakes and will ensure they turn out moist and delicious. Just like any good skeleton, a cupcake needs a sturdy backbone, and these ingredients provide just that.
A skull wouldn't be complete without its eerie white complexion, and neither would your cupcakes. To achieve that ghostly look, you'll need some white icing. You can either make your own or find pre-made icing at the store. Whichever you choose, make sure it's thick enough to hold its shape and give your cupcakes that bone-chilling finish.
Now that we have our ingredients ready, it's time to bring these spooky skull cupcakes to life. Don't worry; the process is easier than conjuring up spirits on Halloween night.
Start by mixing the base ingredients together in a large bowl. Combine the flour, sugar, eggs, butter, and baking powder, and stir until you have a smooth batter. Think of it as stirring a cauldron, but instead of a magic potion, you're creating a delicious cupcake batter.
Once you have your batter ready, it's time to shape your cupcakes into skull-like figures. Use a skull-shaped cupcake mold or create your own by shaping the batter with your hands. Don't worry about perfection; the beauty of these spooky treats lies in their imperfections.
Place your skull-shaped cupcakes in the oven and bake them until they're golden brown. While they're baking, you can prepare your icing. Whichever method you choose, make sure the icing is thick enough to hold its shape and give your cupcakes that ghostly appearance.
Once your cupcakes have cooled, it's time to unleash the spookiness. Use your white icing to create the skull-like features on each cupcake. Let your imagination run wild and get creative with the eyes, nose, and mouth. Remember, the scarier, the better!
Now that your creepy Halloween skull cupcakes are complete, it's time to dive into the deliciously eerie world you've created. Display them on a spooky platter or serve them individually to your guests. These cupcakes are guaranteed to send shivers down their spines and satisfy their sweet tooth at the same time.
These creepy Halloween skull cupcakes are the perfect addition to your spooky festivities. With their eerie appearance and delicious taste, they're sure to be a hit with both kids and adults alike. So, gather your ingredients, unleash your creativity, and get ready to impress your guests with these bone-chilling treats!
Of course! While white icing gives the cupcakes a ghostly appearance, you can experiment with different colors to match your Halloween theme. Try black, red, or even neon green for a truly spooky effect.
Absolutely! You can bake the cupcakes a day or two in advance and store them in an airtight container. Wait to frost them until shortly before serving to keep them fresh and ensure the icing stays intact.
If stored properly, these cupcakes can last for up to three days. However, they're so delicious and spooky that they're unlikely to stick around for that long!
Definitely! Feel free to get creative and add additional decorations to your cupcakes. You can use edible eyeballs, gummy worms, or even sprinkle some edible glitter for an extra magical touch.
Absolutely! While the recipe calls for a basic vanilla cupcake, you can experiment with different flavors to suit your taste. Chocolate, lemon, or even pumpkin spice cupcakes would all work wonderfully with the skull theme.
Definitely! In fact, these cupcakes are a great way to get the whole family involved in the Halloween spirit. Let the kids help mix the batter, shape the cupcakes, and decorate the skulls. It's a fun and spooky activity for everyone to enjoy.
Absolutely! If you want to add an extra surprise to your cupcakes, you can fill them with a spooky filling like raspberry jam or chocolate ganache. Just make a small hole in the bottom of each cupcake after they're baked and use a piping bag to fill them with your chosen filling.
Definitely! There are plenty of gluten-free flour options available that you can use as a substitute. Just make sure to follow the instructions on the gluten-free flour package and adjust the measurements accordingly.
AprilCook, recipe developer and the heart of Chefwiz. More about April