Berry Galette
Rate this recipeBe the first to rate
 By AprilPublished
 Are you looking for a quick and easy dessert that will impress your guests?
 By AprilPublished
 Are you looking for a quick and easy dessert that will impress your guests?
In a food processor, combine flour, sugar, and salt. Pulse until well mixed.
Add butter and cream cheese to the mixture. Pulse until it resembles wet sand.
Sprinkle 1 tablespoon of ice water over the mixture and pulse until the dough starts to clump together. Add more water if needed.
Transfer the dough onto a sheet of plastic wrap. Press it together to form a cohesive ball. Use the wrap to shape it into a thick disk. Wrap it tightly and refrigerate for at least 1 hour or overnight.
Line a baking sheet with parchment paper and lightly dust a work surface with flour.
Roll the chilled dough into a 12-inch circle, moving it around to prevent sticking. Trim any rough edges if necessary.
Fold the dough into quarters and gently transfer it to the prepared baking sheet. Unfold it.
Refrigerate the dough while preparing the filling.
Preheat the oven to 400 degrees F (200 degrees C).
In a large bowl, combine the berries, lemon juice, and vanilla extract. In a separate small bowl, mix the sugar, cornstarch, and salt. Pour the sugar mixture over the berries and gently toss to combine.
Remove the dough from the refrigerator. Spread jam over the center, leaving a border around the edges. Place the berries over the jam.
Fold the edges of the dough over the berries, pleating it
Are you looking for a quick and easy dessert that will impress your guests? Look no further than a berry galette! This rustic French pastry is bursting with juicy berries and wrapped in a flaky, buttery crust. It's the perfect balance of sweet and tangy, and it's sure to become a favorite in your household. In this article, we'll explore everything you need to know about making a delicious berry galette, from the basic ingredients to some helpful tips and tricks. So, let's dive in and discover the joy of baking this mouthwatering treat!
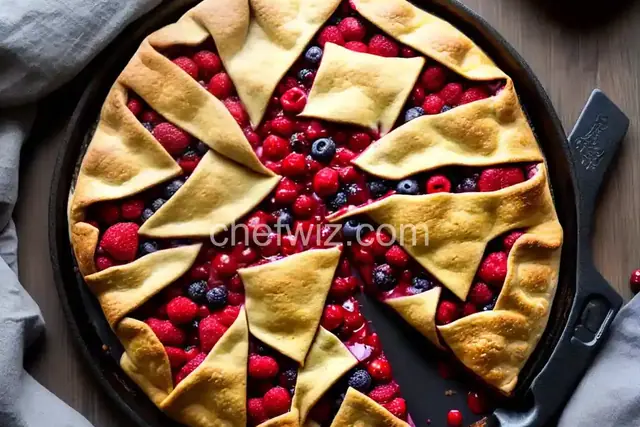
What makes a berry galette so special? Well, imagine a warm, golden-brown crust that cradles a medley of sweet and tart berries. The juices from the berries meld together, creating a burst of flavor with every bite. And the best part? A galette is meant to look rustic and imperfect, so there's no need to worry about making it look picture-perfect. It's the epitome of homemade goodness that will make your taste buds dance with delight.
When it comes to making a berry galette, the choice of berries is key. You want to select berries that are ripe, juicy, and bursting with flavor. Strawberries, blueberries, raspberries, and blackberries are all great options. You can use a single type of berry or mix and match for a more vibrant and diverse flavor. Just make sure to wash and dry the berries thoroughly before using them in your galette.
The crust is an essential part of any galette, and making it from scratch is easier than you might think. It all starts with a simple mixture of flour, butter, sugar, and salt. You'll want to cut the cold butter into small pieces and work it into the flour until it resembles coarse crumbs. Then, add a bit of ice water and gently mix until the dough comes together. The key here is not to overmix. You want the butter to remain in small chunks throughout the dough, as this is what creates the flaky texture.
Once you have your crust and berries ready, it's time to assemble your galette. Roll out the dough into a rough circle and transfer it onto a baking sheet lined with parchment paper. Pile the berries in the center, leaving a border of dough around the edges. Gently fold the edges of the dough over the berries, creating a rustic, free-form shape. Brush the crust with an egg wash for a beautiful golden finish, and sprinkle some sugar on top to add a touch of sweetness.
When it comes to baking, preheat your oven to the recommended temperature and place the galette on the center rack. The baking time may vary depending on your oven and the size of your galette, so keep a close eye on it. You'll know it's done when the crust turns golden and the berries are bubbling. Allow the galette to cool slightly before serving, as the filling will be very hot.
Berry galettes are a delightful and versatile dessert that can be enjoyed year-round. With their rustic charm and burst of fruity flavors, they are sure to impress your family and friends. Whether you're a seasoned baker or new to the kitchen, making a berry galette is a fun and rewarding experience. So, gather your ingredients, roll up your sleeves, and let your creativity shine as you create a delicious masterpiece!
Absolutely! Frozen berries work just as well in a galette. Just make sure to thaw and drain them before using, as excess liquid can make the crust soggy.
Of course! While berries are the classic choice for a galette, you can experiment with other fruits like peaches, apples, or even tropical fruits like mangoes.
Yes, you can prepare the crust ahead of time and refrigerate it until you're ready to assemble and bake the galette. Just make sure to let it come to room temperature before rolling it out.
Yes, you can freeze a baked galette. Just wrap it tightly in plastic wrap or aluminum foil and place it in an airtight container. When you're ready to enjoy it, thaw it in the refrigerator overnight and reheat it in a preheated oven for a few minutes.
Absolutely! A scoop of vanilla ice cream or a dollop of whipped cream pairs perfectly with a warm slice of berry galette. It adds a creamy and indulgent touch to the tangy sweetness of the berries.
While making the crust from scratch is part of the joy of baking a galette, you can certainly use a store-bought pie crust if you're short on time. Just make sure to follow the package instructions for baking.
Absolutely! Galettes are versatile and can be filled with a variety of ingredients. You can create a savory galette with vegetables like tomatoes, zucchini, or mushrooms. The possibilities are endless!
Yes, you can easily double the recipe to make a larger galette. Just make sure to adjust the baking time accordingly, as a larger galette may need a bit more time in the oven.
AprilCook, recipe developer and the heart of Chefwiz. More about April