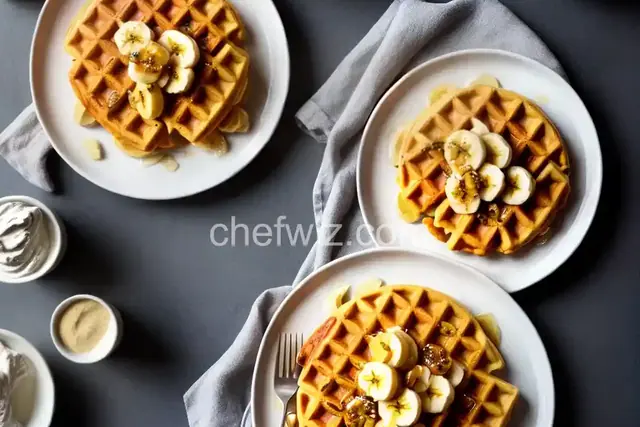
Who doesn't love a warm, fluffy waffle for breakfast? And when those waffles are Belgian buttermilk waffles topped with glazed bananas, it's like a match made in heaven. In this article, we will explore the wonders of this delectable dish and how you can recreate it in your own kitchen. So, grab your apron and let's get cooking!
The Secret to Fluffy Waffles
What makes Belgian waffles so special? It's all in the batter. The secret to achieving that light and airy texture lies in the buttermilk. Buttermilk adds a tangy flavor and acidity that helps the waffles rise and become incredibly fluffy. Combined with the right amount of leavening agents, you'll have waffles that are crisp on the outside and tender on the inside.
The Glazed Banana Magic
Now, let's talk about those glazed bananas. They add a sweet and caramelized touch to the waffles that takes them to the next level. By sautéing sliced bananas in a butter and brown sugar mixture, you create a heavenly glaze that complements the waffles perfectly. The combination of the warm, gooey bananas with the crisp waffles is a match made in breakfast heaven.
How to Make Belgian Buttermilk Waffles
Now that we've covered the basics, let's dive into the step-by-step process of making these mouthwatering waffles.
Preparation and Ingredients
Before you start, gather all the necessary ingredients: flour, baking powder, baking soda, sugar, salt, eggs, buttermilk, melted butter, and vanilla extract. Preheat your waffle iron and lightly grease it to prevent sticking.
Mixing the Batter
In a large bowl, whisk together the dry ingredients: flour, baking powder, baking soda, sugar, and salt. In a separate bowl, beat the eggs and then add the buttermilk, melted butter, and vanilla extract. Gradually pour the wet ingredients into the dry ingredients and mix until just combined. Be careful not to overmix, as this can result in dense waffles.
Cooking the Waffles
Once the batter is ready, pour the desired amount onto the preheated waffle iron and close the lid. Cook until the waffles are golden brown and crispy, usually around 3-4 minutes. Repeat this process until all the batter is used.
Glazing the Bananas
While the waffles are cooking, it's time to prepare the glazed bananas. In a skillet, melt some butter and add brown sugar. Stir until the sugar has dissolved and the mixture is bubbly. Add the sliced bananas and cook until they are coated in the glaze and slightly caramelized.
Serving and Enjoying
Once the waffles are cooked and the bananas are glazed, it's time to assemble your masterpiece. Place a waffle on a plate and top it with the glazed bananas. Drizzle any remaining glaze over the waffle and add a dollop of whipped cream or a sprinkle of powdered sugar for an extra touch of decadence. Grab a fork, dig in, and savor every bite of this delightful breakfast treat.
In Conclusion
Belgian buttermilk waffles with glazed bananas are a breakfast dream come true. The fluffy waffles, combined with the sweet and sticky glaze of the bananas, create a harmonious flavor explosion in every bite. Whether you're enjoying them on a lazy Sunday morning or serving them to impress your brunch guests, these waffles are sure to leave everyone craving more. So, fire up that waffle iron and treat yourself to a breakfast that will make your taste buds sing!
Frequently asked questions
- . Can I use regular milk instead of buttermilk?
Yes, you can substitute regular milk for buttermilk. However, the tangy flavor and tenderness of the waffles may be slightly compromised.
- . Can I freeze the leftover waffles?
Absolutely! Once the waffles have cooled, place them in an airtight container or freezer bag and freeze for up to 3 months. To reheat, simply pop them in the toaster or oven.
- . Can I make the glazed bananas ahead of time?
While it's best to enjoy the glazed bananas immediately, you can prepare them in advance and reheat them gently on the stovetop before serving.
- . Can I add other toppings to the waffles?
Definitely! Get creative and experiment with different toppings like fresh berries, chocolate chips, or even a drizzle of maple syrup.
- . Can I make the waffles vegan?
Absolutely! You can substitute the eggs with a flax or chia seed egg, use plant-based milk instead of buttermilk, and swap the butter with a vegan alternative.
- . Can I use a pancake mix for the waffles?
While it is possible to use a pancake mix, the results may not be as light and fluffy as when using a homemade batter specifically designed for waffles.
- . Can I make mini waffles instead of regular-sized ones?
Of course! If you have a mini waffle iron, you can create adorable bite-sized waffles that are perfect for snacking or serving at brunch parties.
- . Can I make gluten-free waffles?
Yes, you can substitute the all-purpose flour with a gluten-free flour blend. Just make sure the blend contains a binder like xanthan gum to help hold the waffles together.
 By AprilPublished